Tutorial 4: 2D platform game (for beginners). Part 1.
Introduction:
In this tutorial we will make simple 2D platformer with Unity engine. Built-in physics2D will be used in the tutorial. Also I want to show the basics of animation (we will work with sprite sheets). For this tutorial you will need some different files such as sprite sheets, sounds. You can download .zip archive here.1. Step
Start Unity and create new 2D project.
2. Step
First make the ground for our game. Import the largeGround from the downloaded archive ( here the link again, if you have not downloaded it. Unpack the .zip archive after you downloaded it).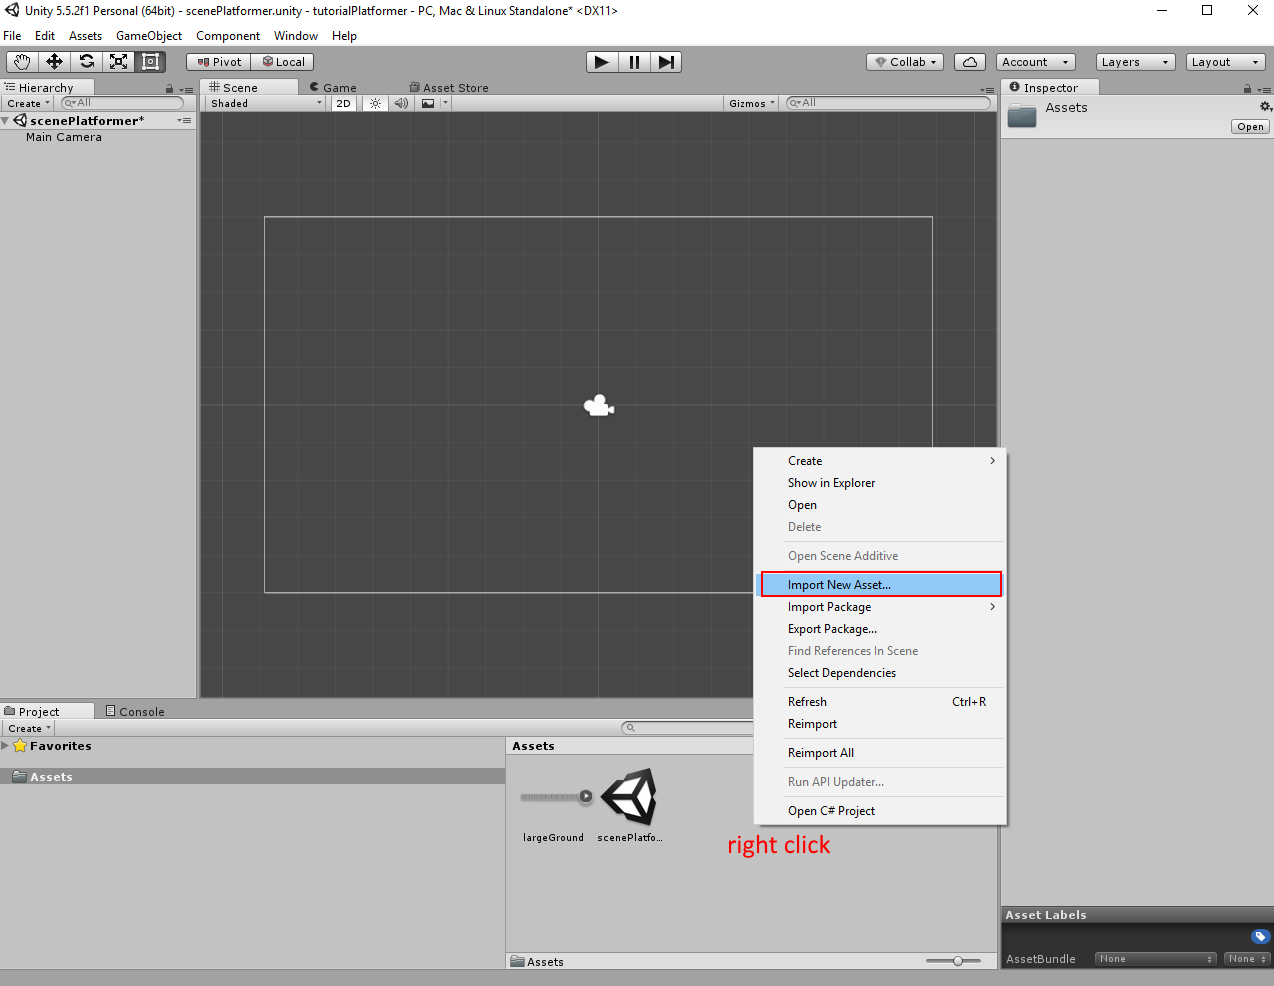
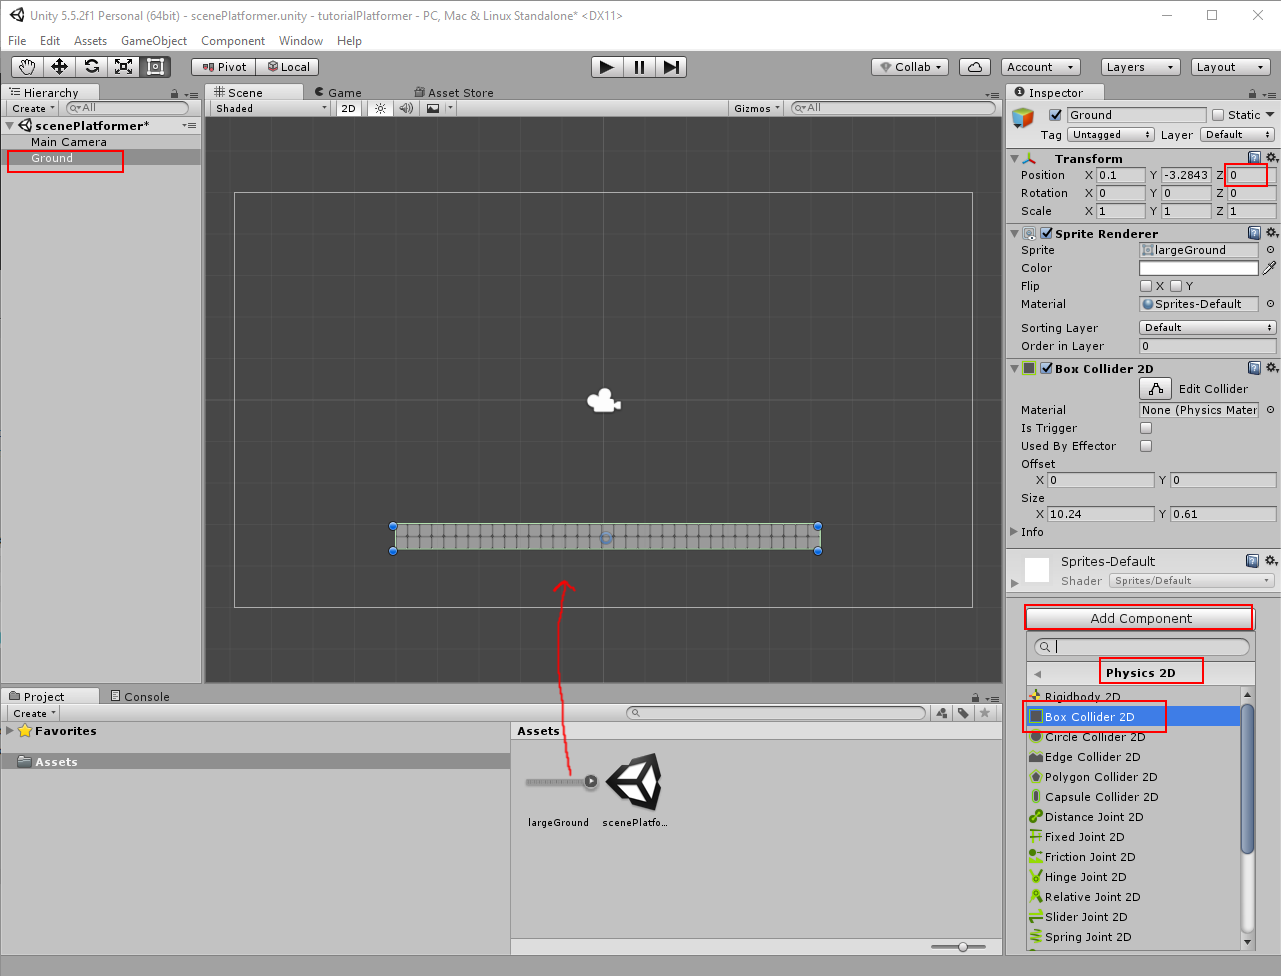
Drag&drop the largeGround in the scene. Rename the created gameobject as Ground Check that Z-Position is zero (change it to 0 if different). Add Box Collider 2D to it.
3. Step
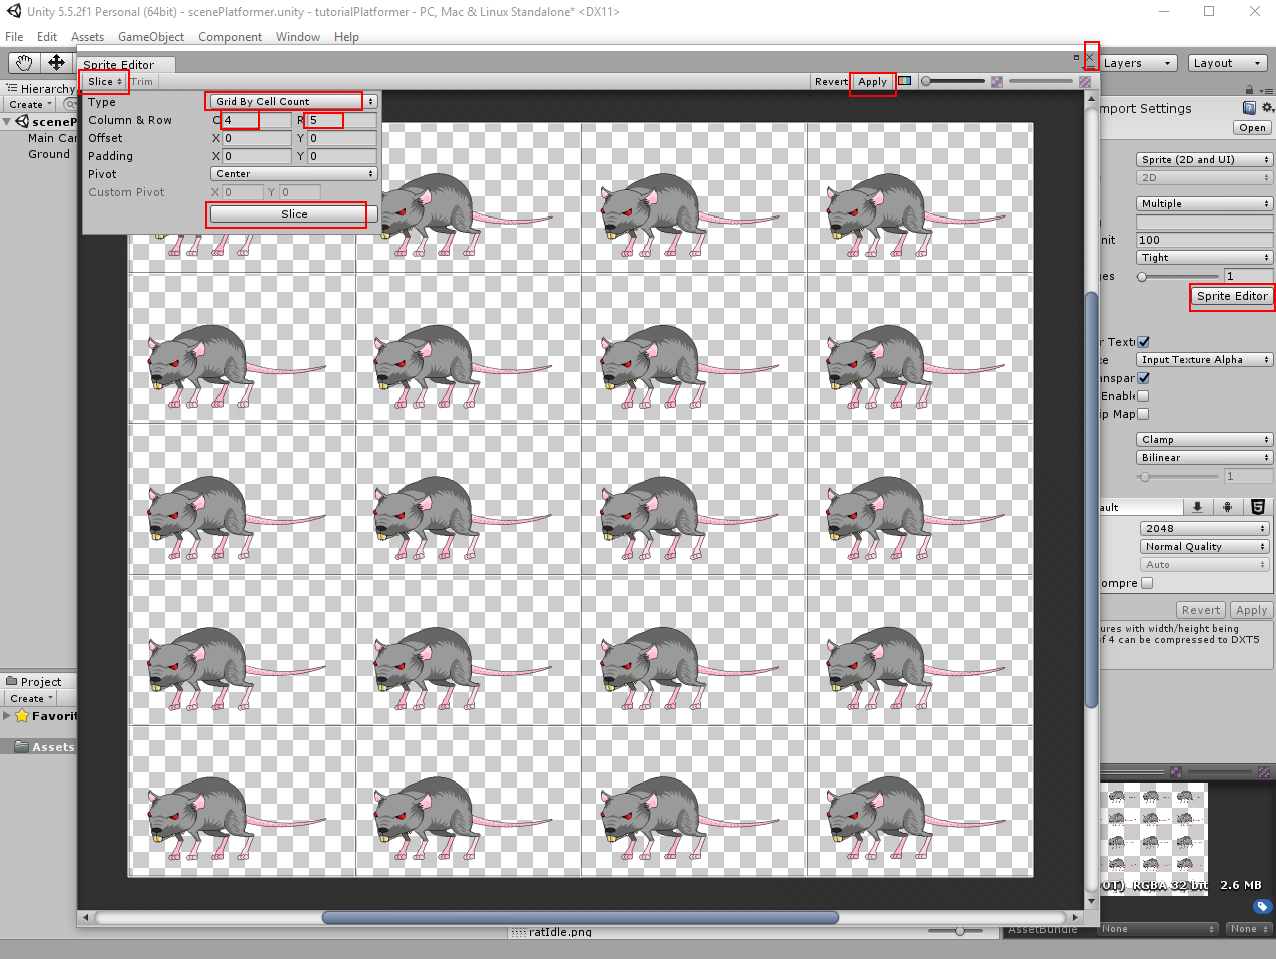
Now we can make the player. I have sprite sheet with rat for that. Import the ratIdle (from downloaded archive) in the Assets window. We should slice the image. Select ratIdle and switch Sprite Mode to Multiple. Click on Apply.
Click on Sprite Editor and new window will be opened. Click on Slice. Change Type to Grid By Cell Count. Set Column to 4 and Row to 5. Click on Slice button. Apply the changes. Close this window.
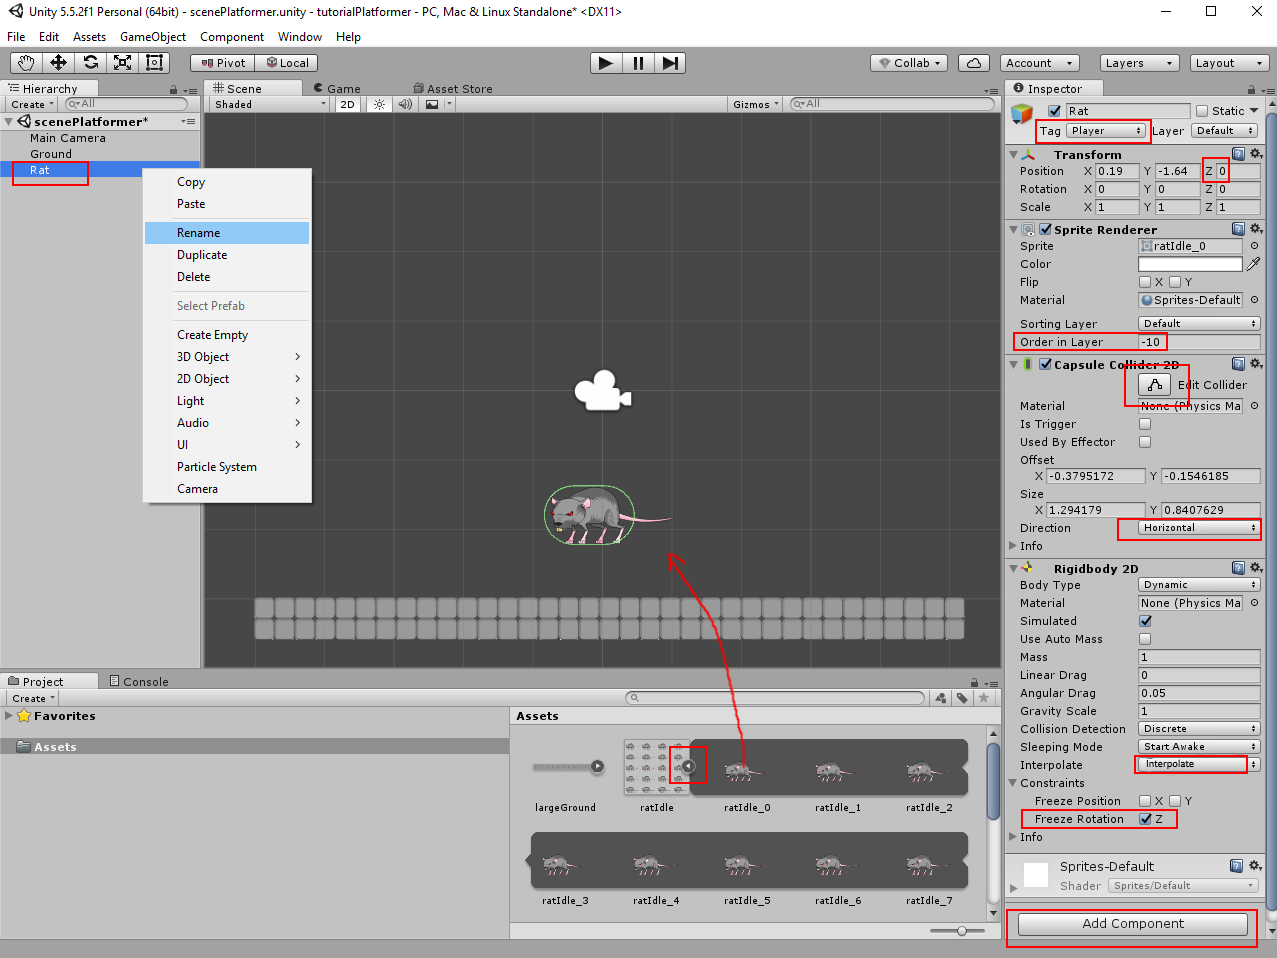
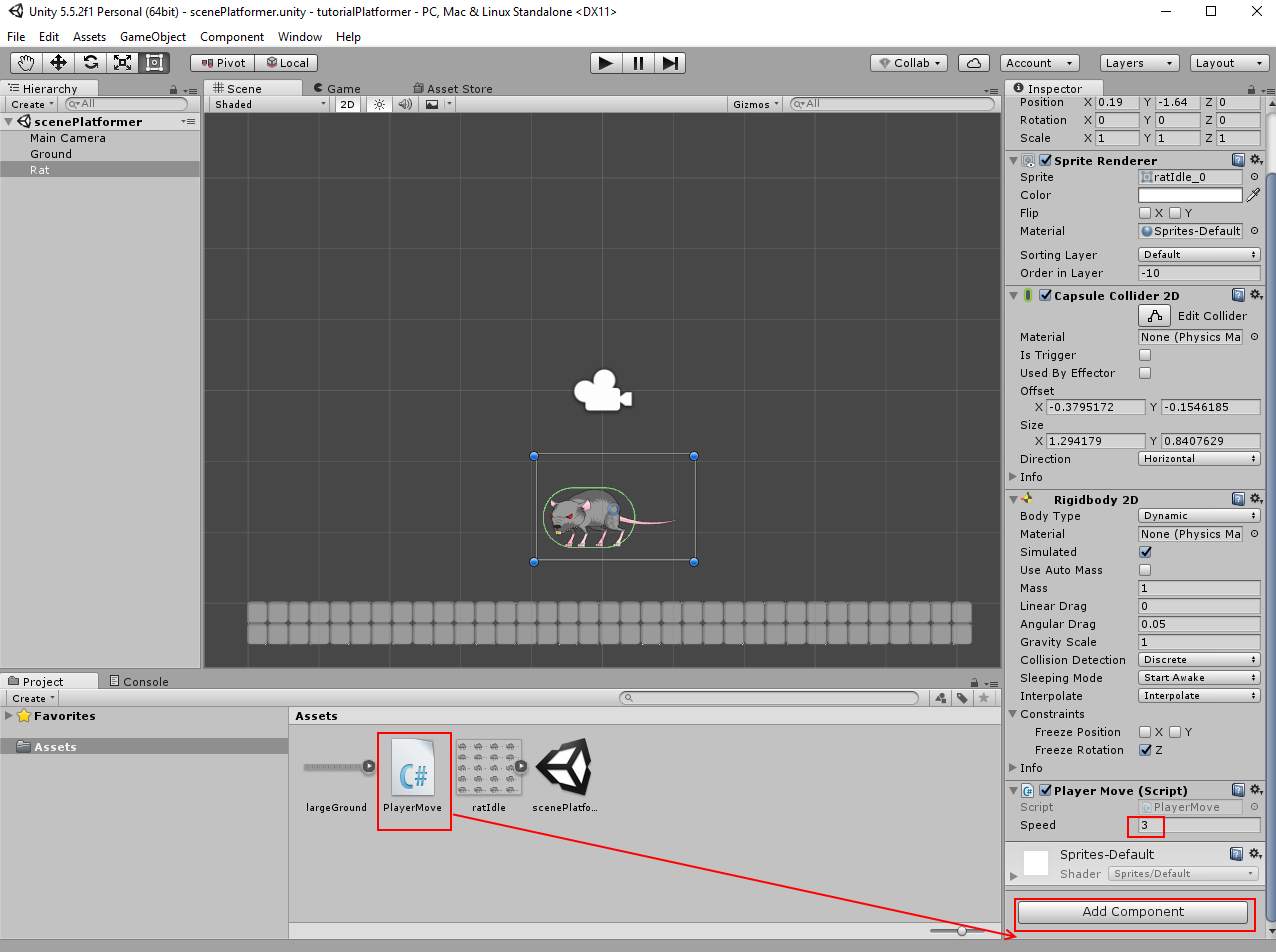
Expand the sprite. It should have now 20 frames. Drag&drop the first frame into the scene. A new gameobject will be created. Select this gameobject and rename it as Rat. Look at its Inspector. Change the Tag to Player. Check, that its Z-Position is zero. Add Capsule Collider 2D. Change Direction to Horizontal. Click on its Edit button and adjust colliders size (pull for the green dots). Then add Rigidbody 2D. Set Interpolate to Interpolate. Expand Constraints and enable Freeze Rotation Z.
4. Step
We need now a movement script for the rat. Create new C# script (right click into Assets) and name it PlayerMove. For the movement we will use built-in physic2D, also we will work with the Rigidbody2D. We can change its velocity depended on the input from Input Manager (I hope, You have read other tutorial, also I don't need to explain about them). Open the PlayerMove script.
using System.Collections;
using System.Collections.Generic;
using UnityEngine;
public class PlayerMove : MonoBehaviour {
//we will use this variable as speed value
public float speed;
//reference variable for Rigidbody2D component
Rigidbody2D rb;
void Start () {
//reference to the Rigidbody2D component
rb = GetComponent <Rigidbody2D> ();
}
void FixedUpdate () {
//declare local float variable and initialize it with value from the Horizontal axis (it can be between -1 and 1)
float x = Input.GetAxis ("Horizontal");
//declare local Vector3 variale and initialize it with calculated values
//x value: value from InputManager * speed
//y value: take the current value, we will not change it, because of using gravity force
//z value: should be zero, we don't need movement on Z-Axis
Vector3 move = new Vector3 (x * speed, rb.velocity.y, 0f);
//change the players velocity with calculated vector
rb.velocity = move;
}
}
Select the rat in the hierarchy and add PlayerMove script to it. Change the speed variable (3 will be good). You can start the game and test the scene. The rat can move left and right (use left/right or A/D).using System.Collections.Generic;
using UnityEngine;
public class PlayerMove : MonoBehaviour {
//we will use this variable as speed value
public float speed;
//reference variable for Rigidbody2D component
Rigidbody2D rb;
void Start () {
//reference to the Rigidbody2D component
rb = GetComponent <Rigidbody2D> ();
}
void FixedUpdate () {
//declare local float variable and initialize it with value from the Horizontal axis (it can be between -1 and 1)
float x = Input.GetAxis ("Horizontal");
//declare local Vector3 variale and initialize it with calculated values
//x value: value from InputManager * speed
//y value: take the current value, we will not change it, because of using gravity force
//z value: should be zero, we don't need movement on Z-Axis
Vector3 move = new Vector3 (x * speed, rb.velocity.y, 0f);
//change the players velocity with calculated vector
rb.velocity = move;
}
}
5. Step
Now we can add jump ability to the rat. We will add the force along the Y-Axis for the jump. Check Unity Manual for info. The force should not be added every time the jump button was pressed, or the rat will fly like rocket. Also we will need a boolean variable to control it. And we need a function to switch this variable in relation to the position of the rat relative to the ground. There are really many ways to achieve this (trigger, raycast, timer, or whatever else). We will use Physics2D.OverlapPoint to detect what layer is under the check point. Check Unity Manual for info. Open PlayerMove script again.
using System.Collections;
using System.Collections.Generic;
using UnityEngine;
public class PlayerMove : MonoBehaviour {
//in the inspector we can choose which layers will be the ground
public LayerMask whatIsGround;
//position for the ground checker
public Transform groundCheck;
//variable, which will be true if rat is on the ground
public bool isGrounded;
//value for force power
public float jumpForce;
//we will use this variable as speed value
public float speed;
//reference variable for Rigidbody2D component
Rigidbody2D rb;
void Start () {
//reference to the Rigidbody2D component
rb = GetComponent <Rigidbody2D> ();
}
//I will use Update() for more correctly jump input
void Update () {
//check if button "Jump" was pressed and rat is on the ground
if (Input.GetButtonDown ("Jump") && isGrounded) {
//add the force on the Rigidbody2D along the Y-Axis for the jump
rb.AddForce (Vector2.up * jumpForce, ForceMode2D.Impulse);
//switch the variable to prevent next jump, or we could jump again (before isGrounded will be switched in FixedUpdate ())
isGrounded = false;
}
}
void FixedUpdate () {
//change the variable depend on resultat from Physics2D.OverlapPoint
isGrounded = Physics2D.OverlapPoint (groundCheck.position, whatIsGround);
//declare local float variable and initialize it with value from the Horizontal axis (it can be between -1 and 1)
float x = Input.GetAxis ("Horizontal");
//declare local Vector3 variale and initialize it with calculated values
//x value: value from InputManager * speed
//y value: take the current value, we will not change it, because of using gravity force
//z value: should be zero, we don't need movement on Z-Axis
Vector3 move = new Vector3 (x * speed, rb.velocity.y, 0f);
//change the players velocity with calculated vector
rb.velocity = move;
}
}
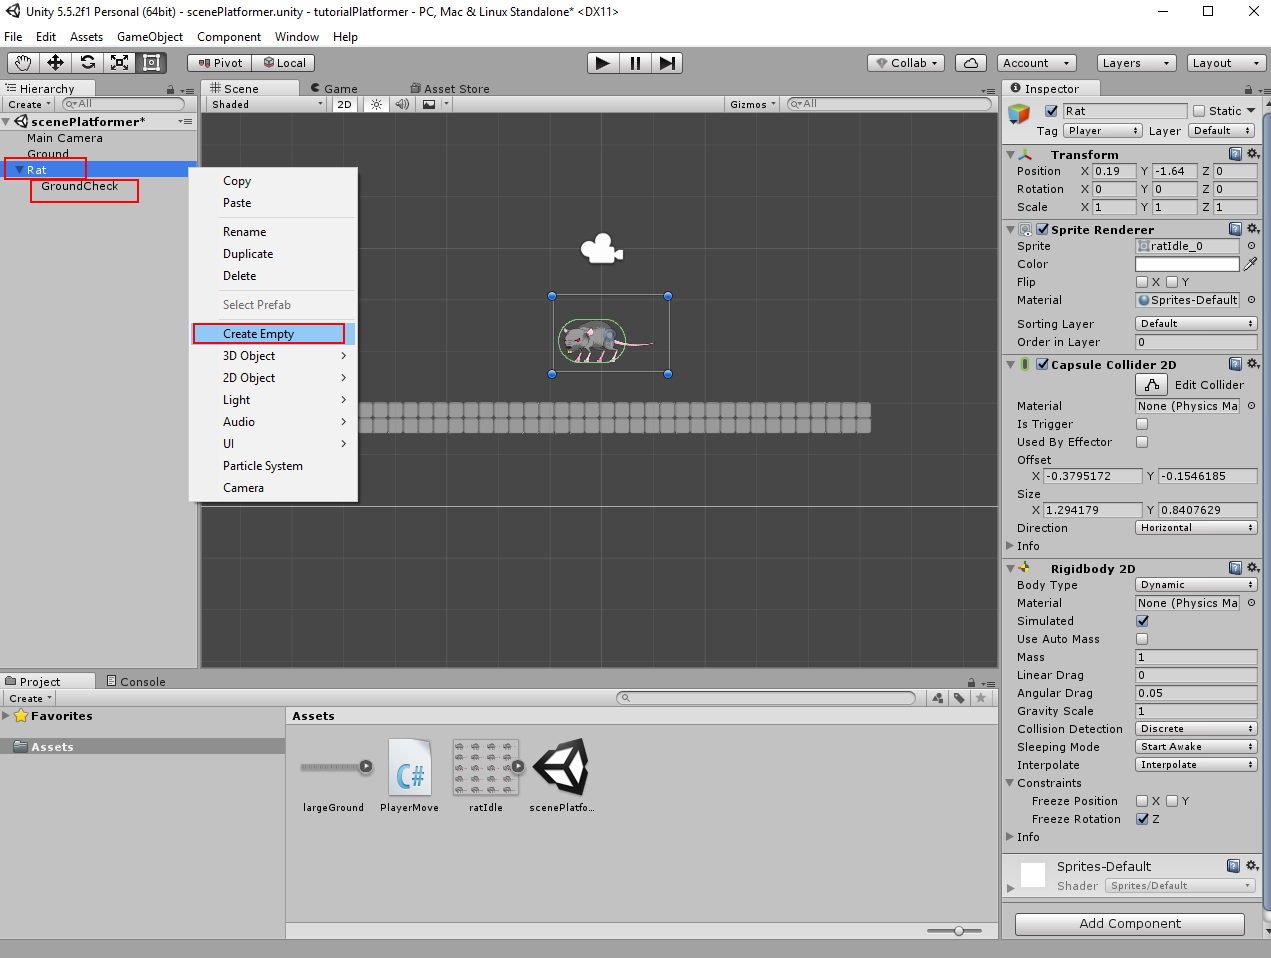
Select Rat in the hierarchy, right click on it and click on Create Empty. Select this new empty object and rename it to GroundCheck. using System.Collections.Generic;
using UnityEngine;
public class PlayerMove : MonoBehaviour {
//in the inspector we can choose which layers will be the ground
public LayerMask whatIsGround;
//position for the ground checker
public Transform groundCheck;
//variable, which will be true if rat is on the ground
public bool isGrounded;
//value for force power
public float jumpForce;
//we will use this variable as speed value
public float speed;
//reference variable for Rigidbody2D component
Rigidbody2D rb;
void Start () {
//reference to the Rigidbody2D component
rb = GetComponent <Rigidbody2D> ();
}
//I will use Update() for more correctly jump input
void Update () {
//check if button "Jump" was pressed and rat is on the ground
if (Input.GetButtonDown ("Jump") && isGrounded) {
//add the force on the Rigidbody2D along the Y-Axis for the jump
rb.AddForce (Vector2.up * jumpForce, ForceMode2D.Impulse);
//switch the variable to prevent next jump, or we could jump again (before isGrounded will be switched in FixedUpdate ())
isGrounded = false;
}
}
void FixedUpdate () {
//change the variable depend on resultat from Physics2D.OverlapPoint
isGrounded = Physics2D.OverlapPoint (groundCheck.position, whatIsGround);
//declare local float variable and initialize it with value from the Horizontal axis (it can be between -1 and 1)
float x = Input.GetAxis ("Horizontal");
//declare local Vector3 variale and initialize it with calculated values
//x value: value from InputManager * speed
//y value: take the current value, we will not change it, because of using gravity force
//z value: should be zero, we don't need movement on Z-Axis
Vector3 move = new Vector3 (x * speed, rb.velocity.y, 0f);
//change the players velocity with calculated vector
rb.velocity = move;
}
}
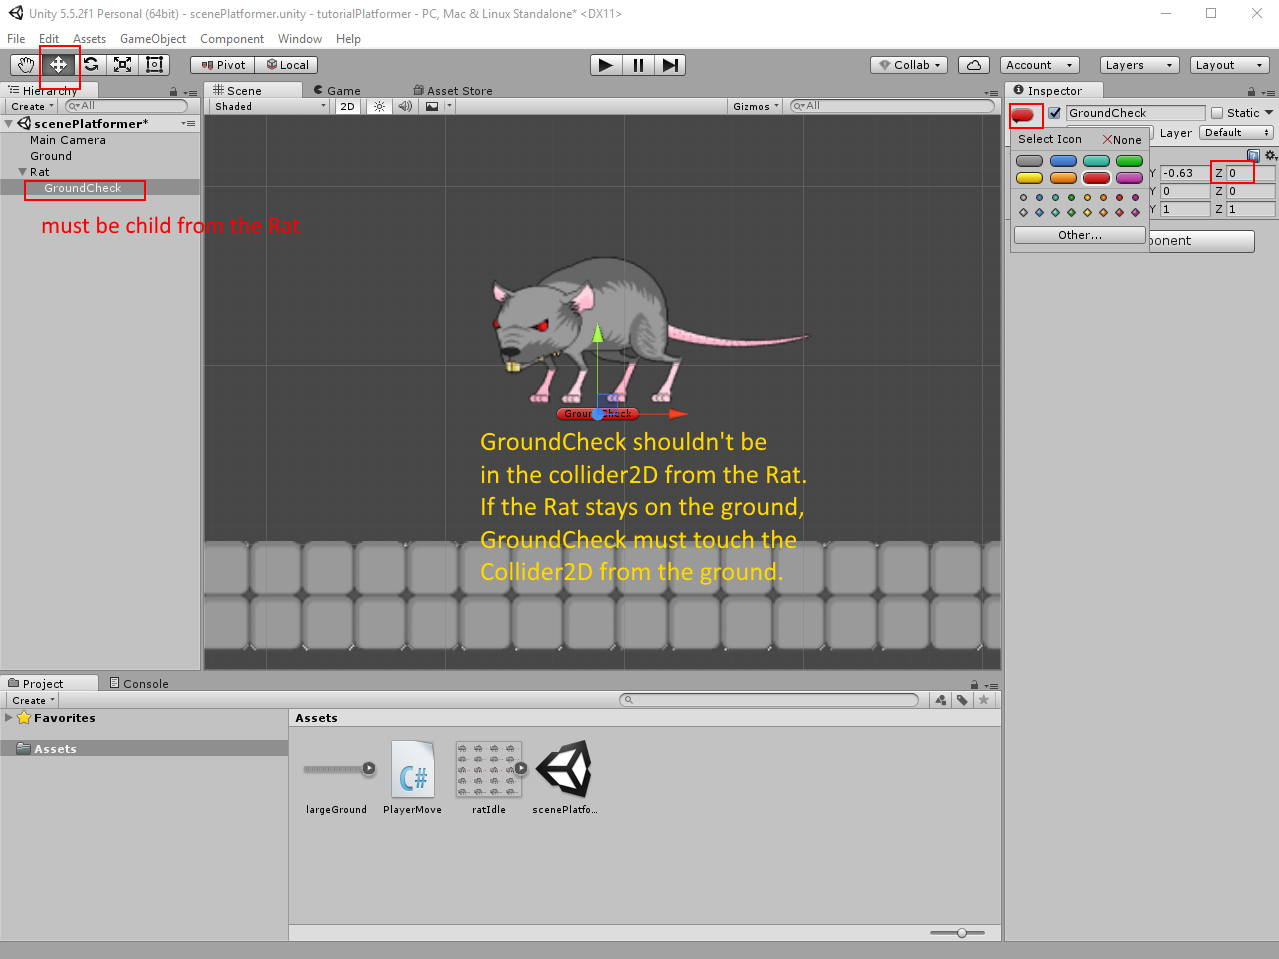
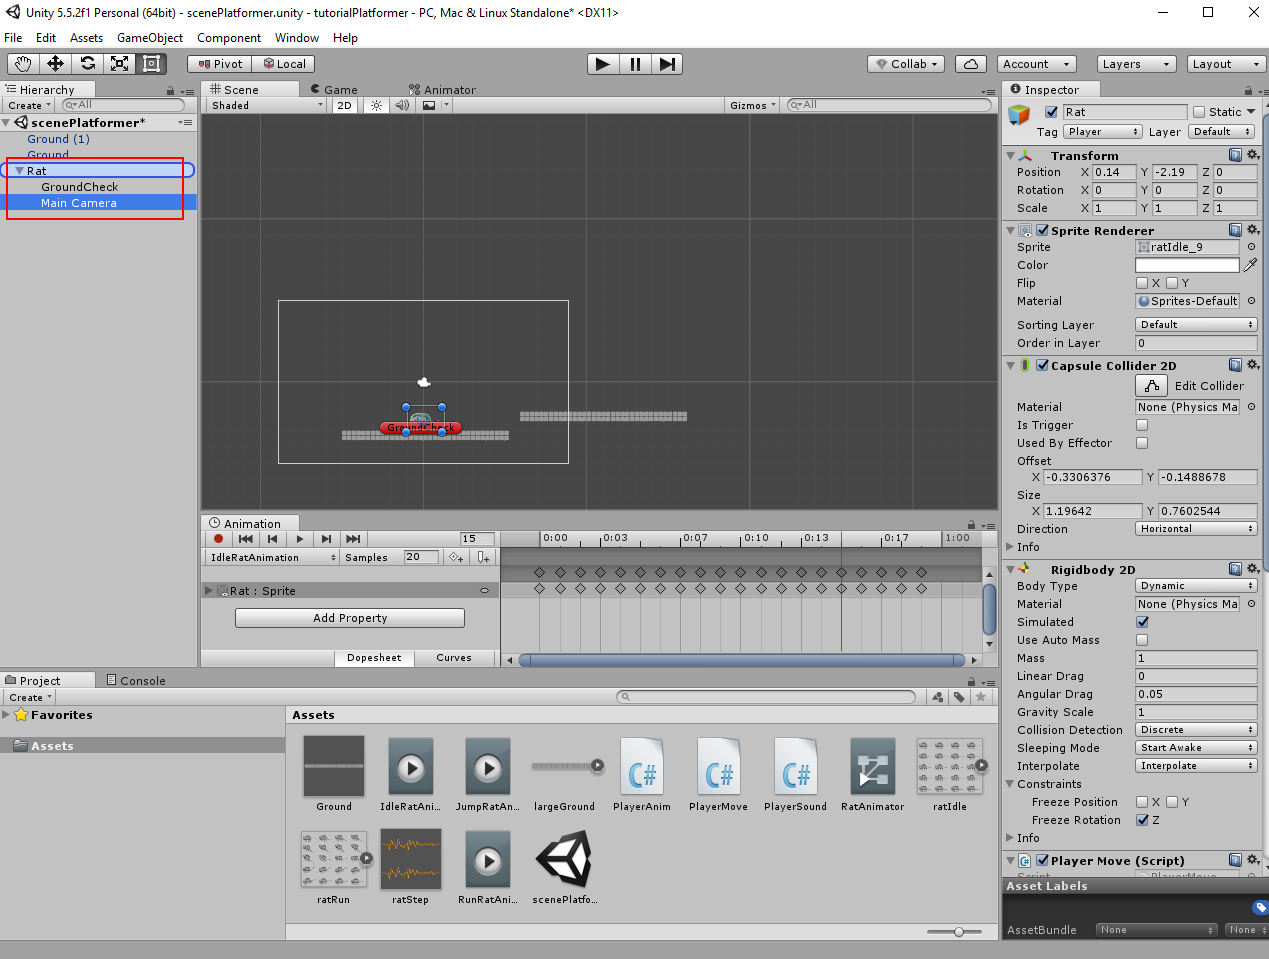
Select GroundCheck and enable an icon for better view (check the screenshot). Enable moving tool and move the GroundCheck below the rat but not in the collider from the rat. Check if its Z-Position is zero.
Select Ground in the hierarchy and switch its Layer to Ground (add new Layer with this name, if you don't have them).

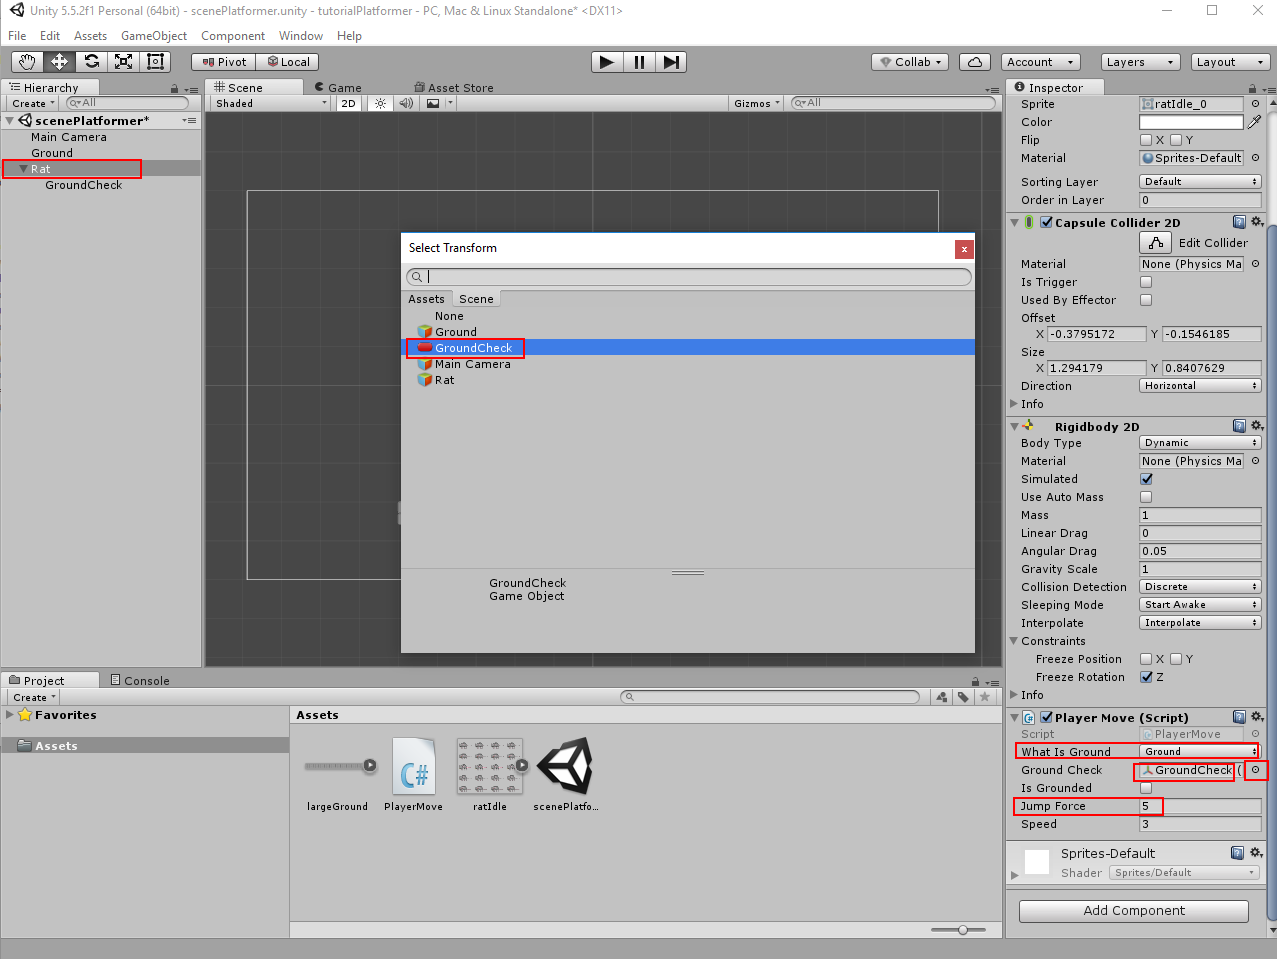
Select Rat in the hierarchy. PlayerMove component has now some new fields. Enable Ground in the whatIsGround. Select GroundCheck for the GroundCheck. Set JumpForce to 5.
Check the game. The Rat can now move left/right and jump.
6. Step
The rat must turn in the direction of movement. We need a function for that. In this function we will check the value of the "Horizontal" axis in the Input Manager and rotate the rat depending on this value. For the rotation we will use the opposite value in the x-axis in the local scale from the Transform component. Open PlayerMove script again.
using System.Collections;
using System.Collections.Generic;
using UnityEngine;
public class PlayerMove : MonoBehaviour {
//in the inspector we can choose which layers will be the ground
public LayerMask whatIsGround;
//position for the ground checker
public Transform groundCheck;
//variable, which will be true if rat is on the ground
public bool isGrounded;
//value for force power
public float jumpForce;
//we will use this variable as speed value
public float speed;
//reference variable for Rigidbody2D component
Rigidbody2D rb;
//this variable controls the looking direction from the rat
public bool isLookingLeft;
void Start () {
//reference to the Rigidbody2D component
rb = GetComponent <Rigidbody2D> ();
}
//I will use Update() for more correctly jump input
void Update () {
//check if button "Jump" was pressed and rat is on the ground
if (Input.GetButtonDown ("Jump") && isGrounded) {
//add the force on the Rigidbody2D along the Y-Axis for the jump
rb.AddForce (Vector2.up * jumpForce, ForceMode2D.Impulse);
//switch the variable to prevent next jump, or we could jump again (befor isGrounded will be switched in FixedUpdate ())
isGrounded = false;
}
}
void FixedUpdate () {
//change the variable depend on resultat from Physics2D.OverlapPoint
isGrounded = Physics2D.OverlapPoint (groundCheck.position, whatIsGround);
//declare local float variable and initialize it with value from the Horizontal axis (it can be between -1 and 1)
float x = Input.GetAxis ("Horizontal");
//declare local Vector3 variale and initialize it with calculated values
//x value: value from InputManager * speed
//y value: take the current value, we will not change it, because of using gravity force
//z value: should be zero, we don't need movement on Z-Axis
Vector3 move = new Vector3 (x * speed, rb.velocity.y, 0f);
//change the players velocity with calculated vector
rb.velocity = move;
//Check whether the direction of look coincides with the direction of movement
if (x < 0 && !isLookingLeft)
//call the function for turning the rat, if check was true
TurnTheRat ();
//Check whether the direction of look coincides with the direction of movement
if (x > 0 && isLookingLeft)
//call the function for turning the rat, if check was true
TurnTheRat ();
}
//the function for turning the rat
void TurnTheRat ()
{
//Switch the variable that shows the direction of the look at the opposite
isLookingLeft = !isLookingLeft;
//turn the rat
transform.localScale = new Vector3 (transform.localScale.x * -1, transform.localScale.y, transform.localScale.z);
}
}
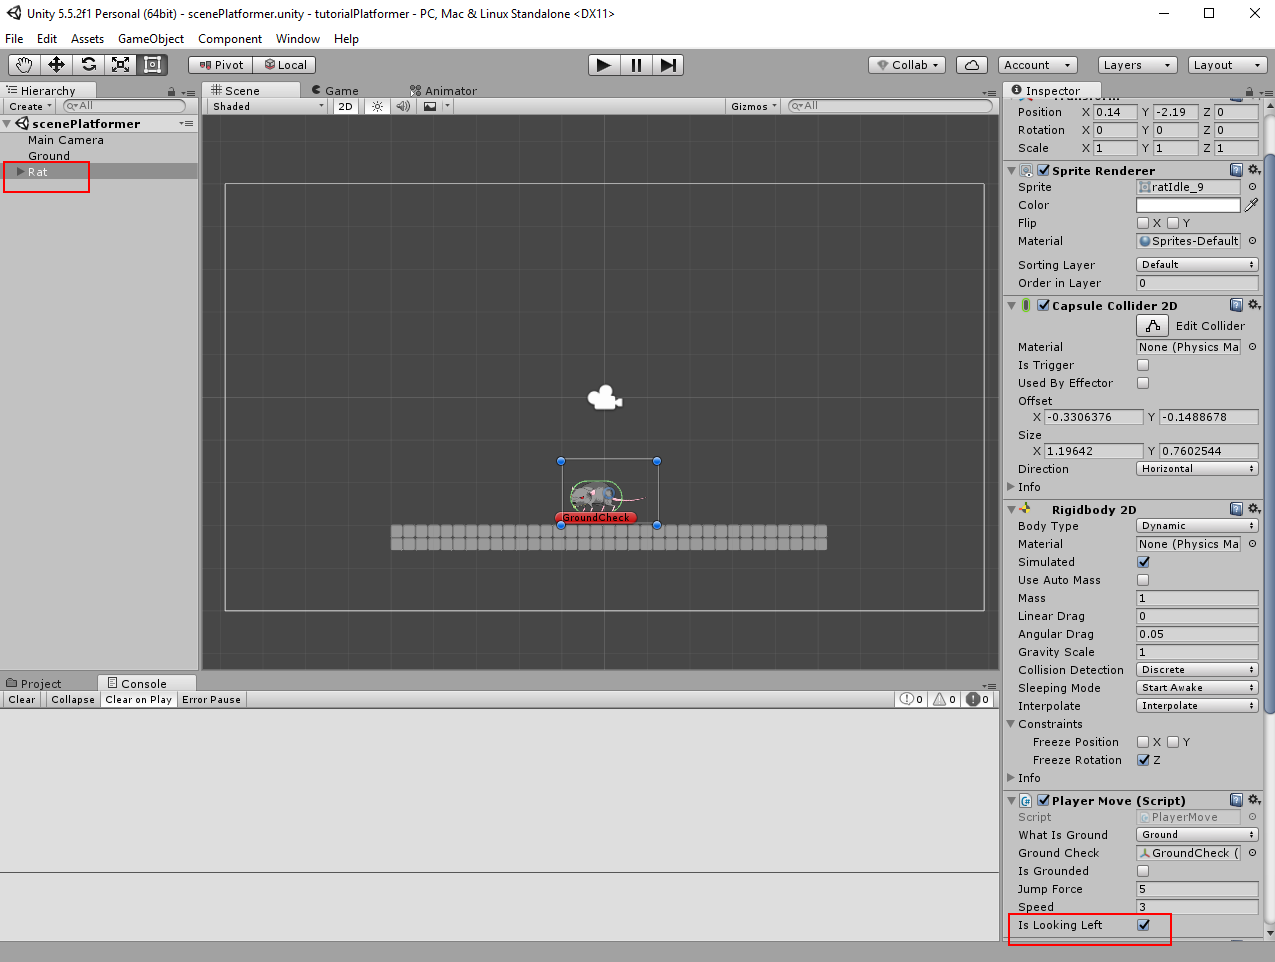
Select the rat. The PlayerMove script has new bool variable for direction of look. Enable it (because the rat looks to the left ).using System.Collections.Generic;
using UnityEngine;
public class PlayerMove : MonoBehaviour {
//in the inspector we can choose which layers will be the ground
public LayerMask whatIsGround;
//position for the ground checker
public Transform groundCheck;
//variable, which will be true if rat is on the ground
public bool isGrounded;
//value for force power
public float jumpForce;
//we will use this variable as speed value
public float speed;
//reference variable for Rigidbody2D component
Rigidbody2D rb;
//this variable controls the looking direction from the rat
public bool isLookingLeft;
void Start () {
//reference to the Rigidbody2D component
rb = GetComponent <Rigidbody2D> ();
}
//I will use Update() for more correctly jump input
void Update () {
//check if button "Jump" was pressed and rat is on the ground
if (Input.GetButtonDown ("Jump") && isGrounded) {
//add the force on the Rigidbody2D along the Y-Axis for the jump
rb.AddForce (Vector2.up * jumpForce, ForceMode2D.Impulse);
//switch the variable to prevent next jump, or we could jump again (befor isGrounded will be switched in FixedUpdate ())
isGrounded = false;
}
}
void FixedUpdate () {
//change the variable depend on resultat from Physics2D.OverlapPoint
isGrounded = Physics2D.OverlapPoint (groundCheck.position, whatIsGround);
//declare local float variable and initialize it with value from the Horizontal axis (it can be between -1 and 1)
float x = Input.GetAxis ("Horizontal");
//declare local Vector3 variale and initialize it with calculated values
//x value: value from InputManager * speed
//y value: take the current value, we will not change it, because of using gravity force
//z value: should be zero, we don't need movement on Z-Axis
Vector3 move = new Vector3 (x * speed, rb.velocity.y, 0f);
//change the players velocity with calculated vector
rb.velocity = move;
//Check whether the direction of look coincides with the direction of movement
if (x < 0 && !isLookingLeft)
//call the function for turning the rat, if check was true
TurnTheRat ();
//Check whether the direction of look coincides with the direction of movement
if (x > 0 && isLookingLeft)
//call the function for turning the rat, if check was true
TurnTheRat ();
}
//the function for turning the rat
void TurnTheRat ()
{
//Switch the variable that shows the direction of the look at the opposite
isLookingLeft = !isLookingLeft;
//turn the rat
transform.localScale = new Vector3 (transform.localScale.x * -1, transform.localScale.y, transform.localScale.z);
}
}
The rat can now run left and right and change the direction of sight. You can check the scene.
7. Step
Now we can start to animate the rat. Select Rat in the hierarchy and add Animator to it.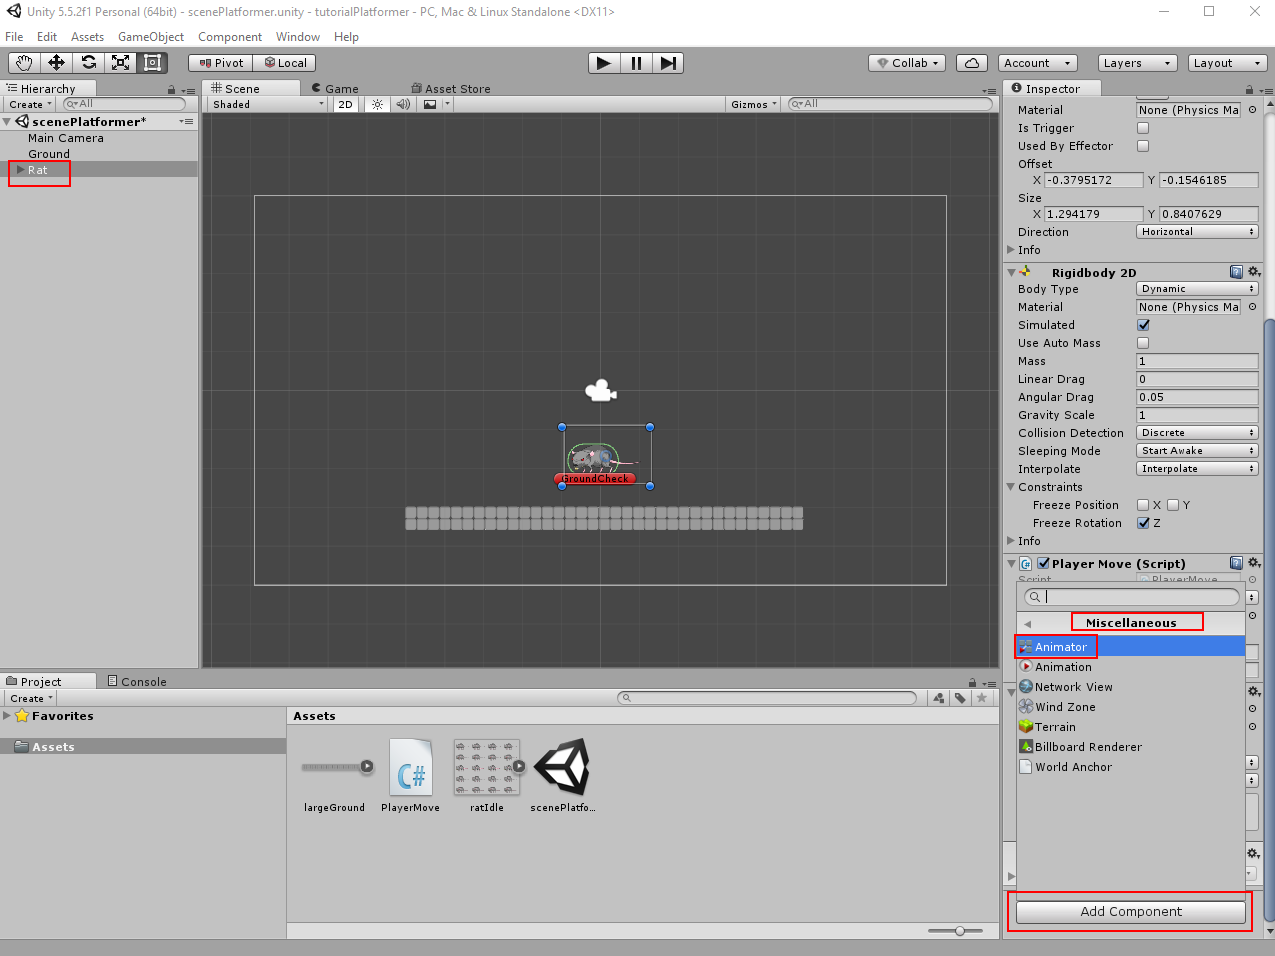
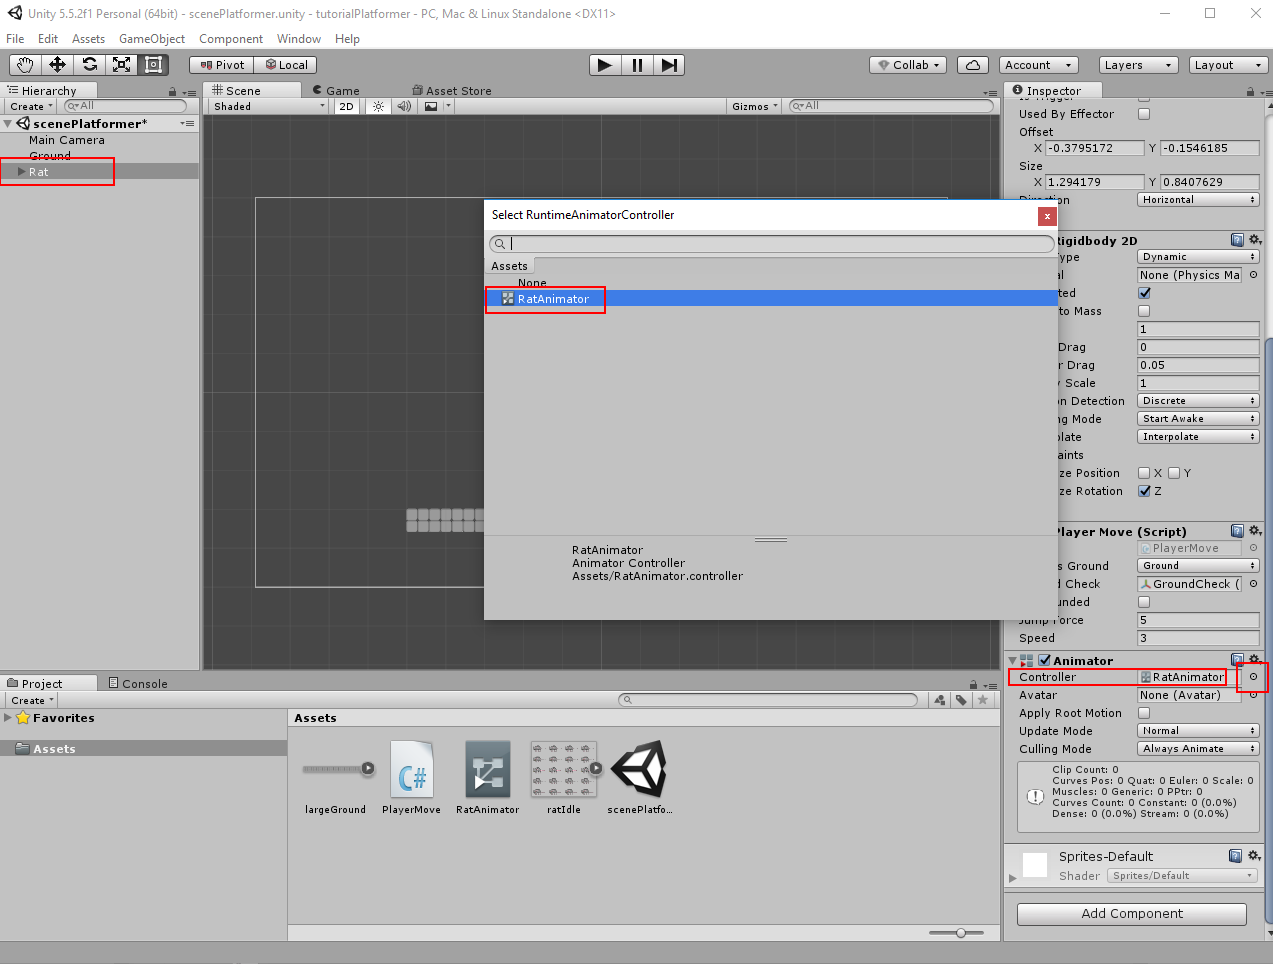
Create Animator Controller in the Assets window. Name it as RatAnimator.

Select Rat and put RatController into Controller field.
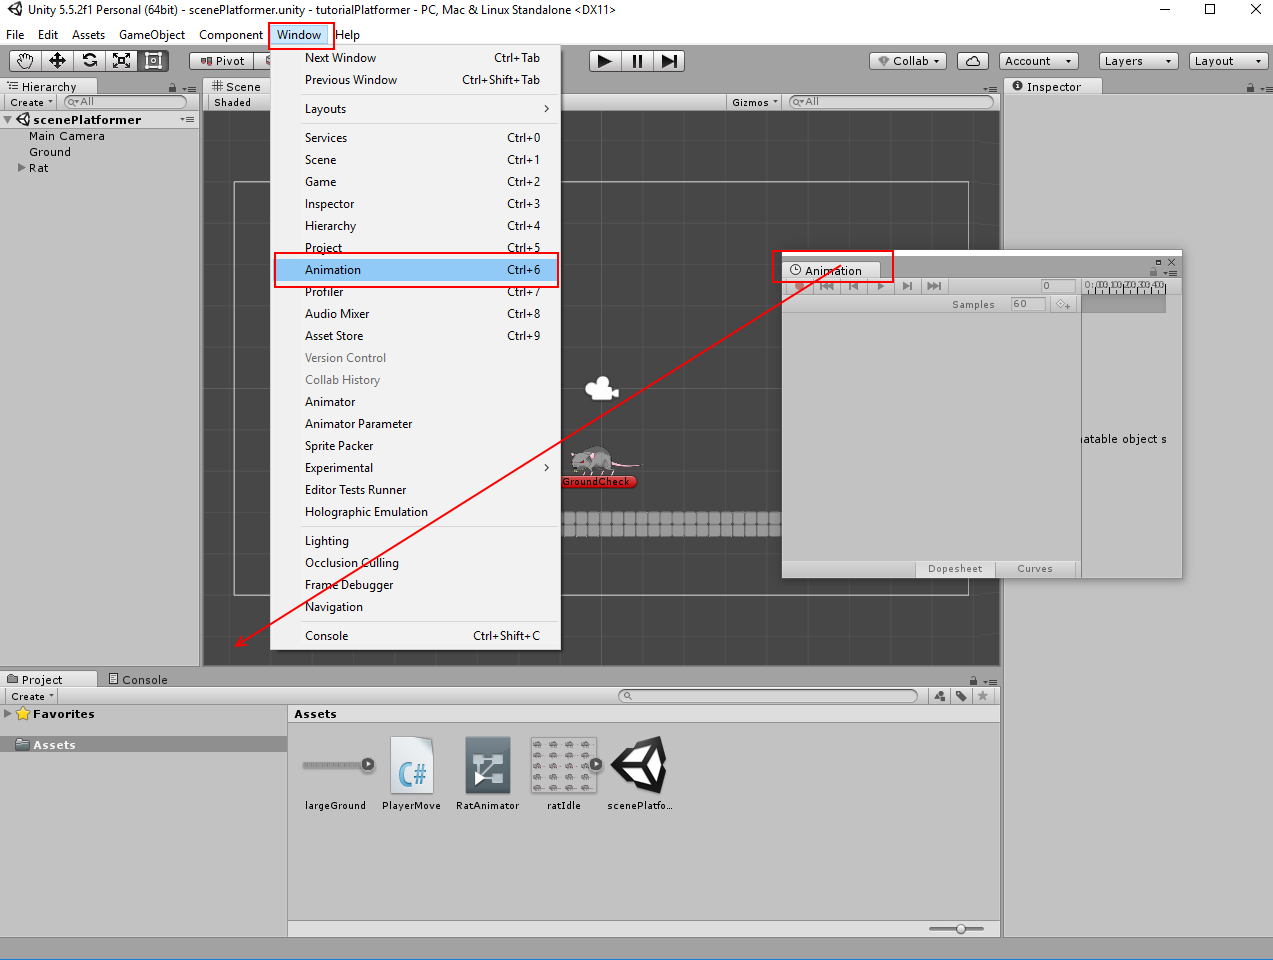
Now we will need an Animation window. Enable it in the Window menu and place it where you like (I have placed it over the Assets window).
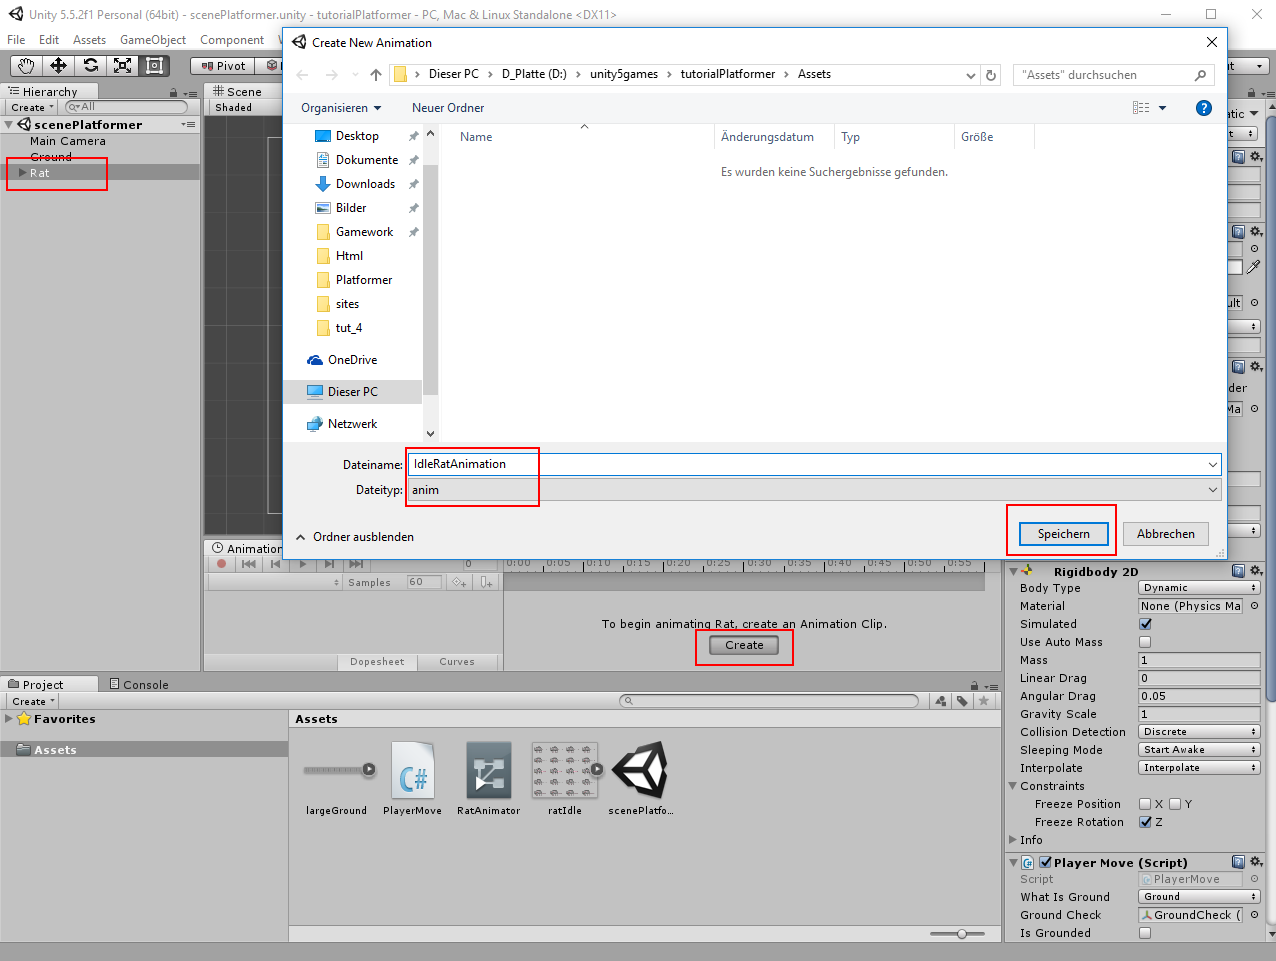
Select Rat in the hierarchy. Create new animation (click on Create button). Name this new animation as IdleRatAnimation.
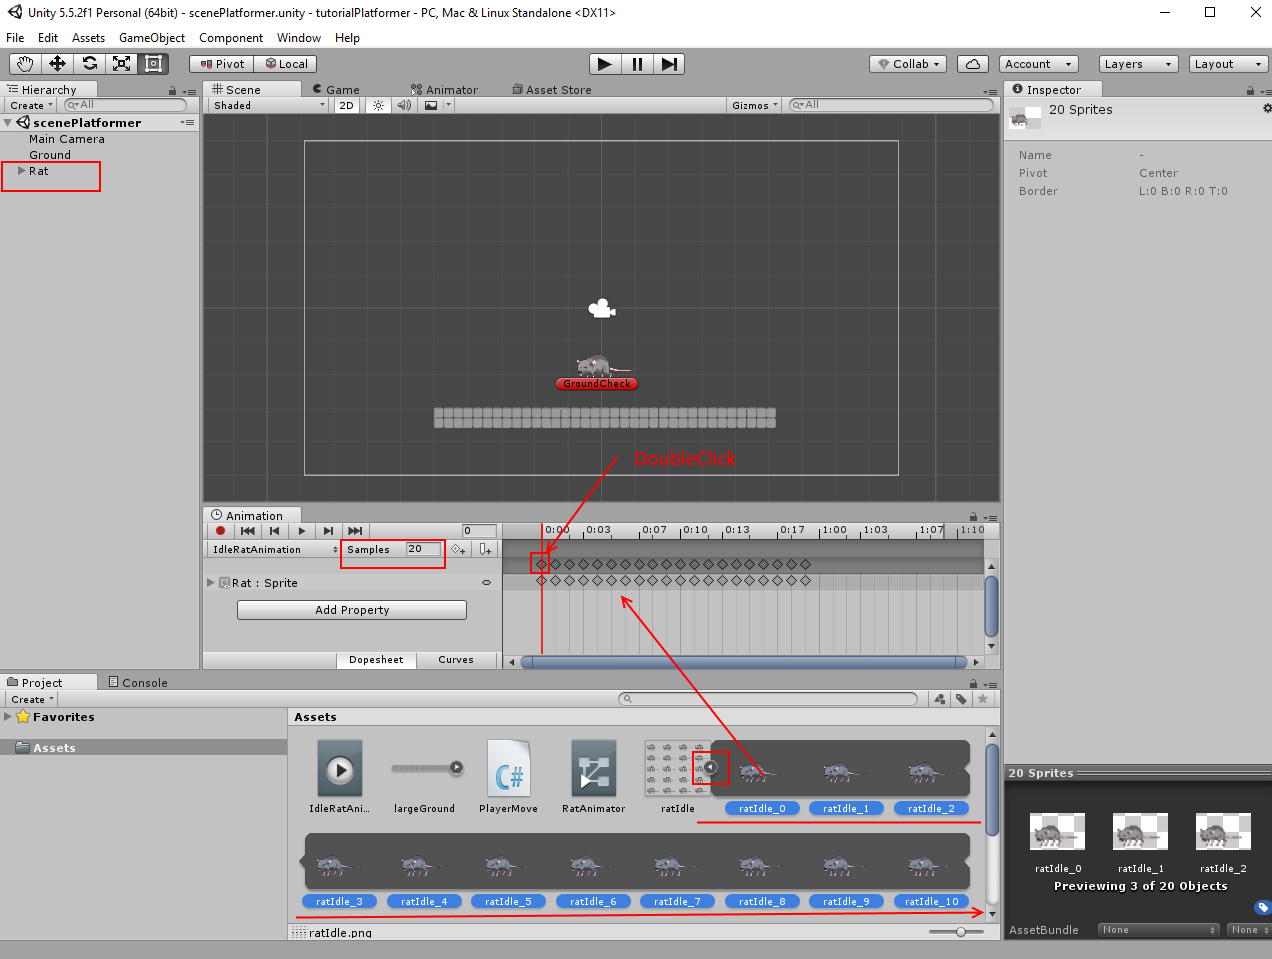
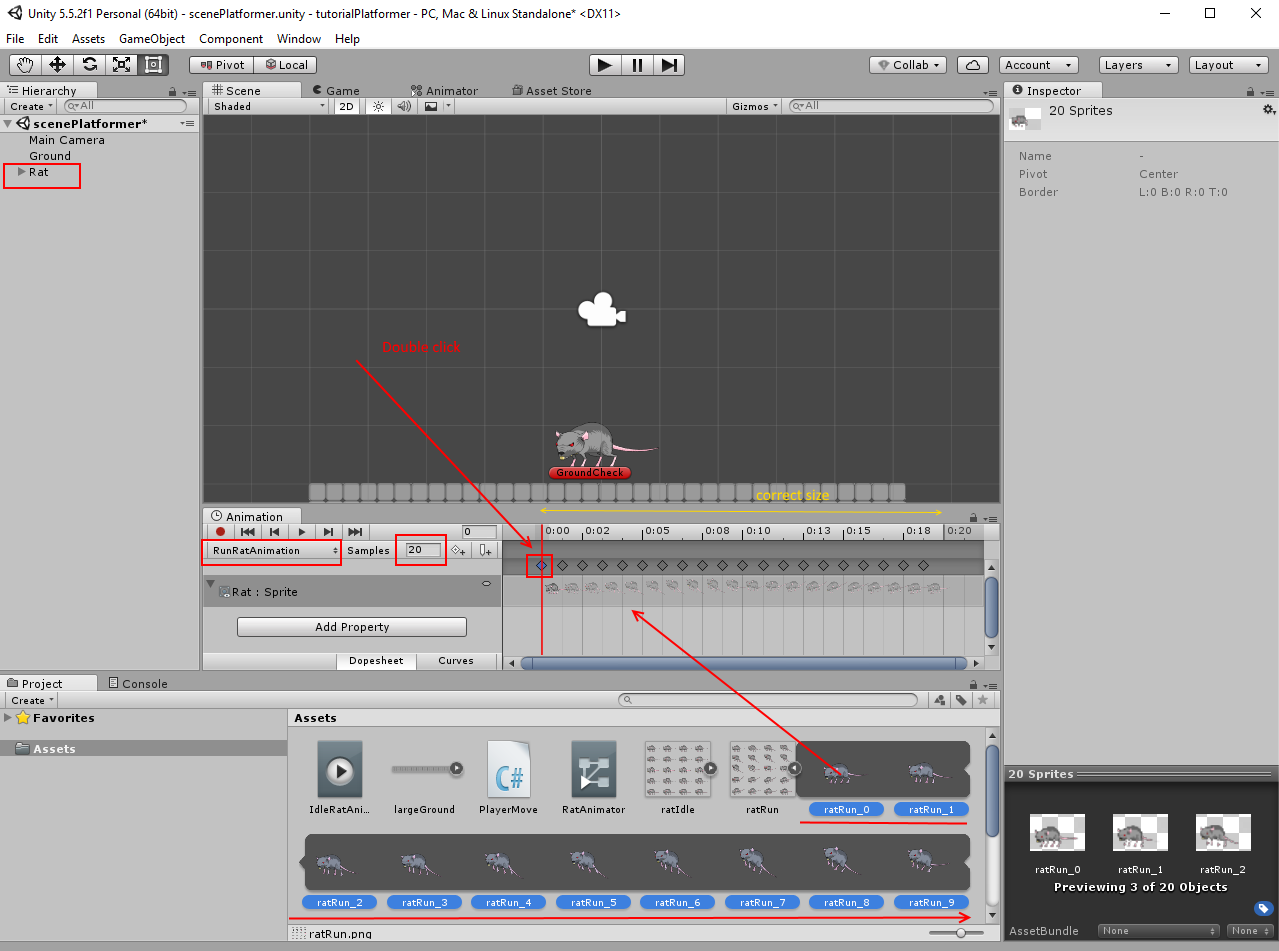
Now we can add sprite sheet. Select Rat in the hierarchy. Expand the ratIdle sprite. You should select now all frames in it. Select first frame hold Shift-Key down and select the last frame. All 20 frames will be selected. Drag&drop selected frames into Animation window. Set samples to 20. You should double click on the first frame or animations lenght can be incorrect (maybe bug in my Unity editor).
Enable Animator window in the Window menu.
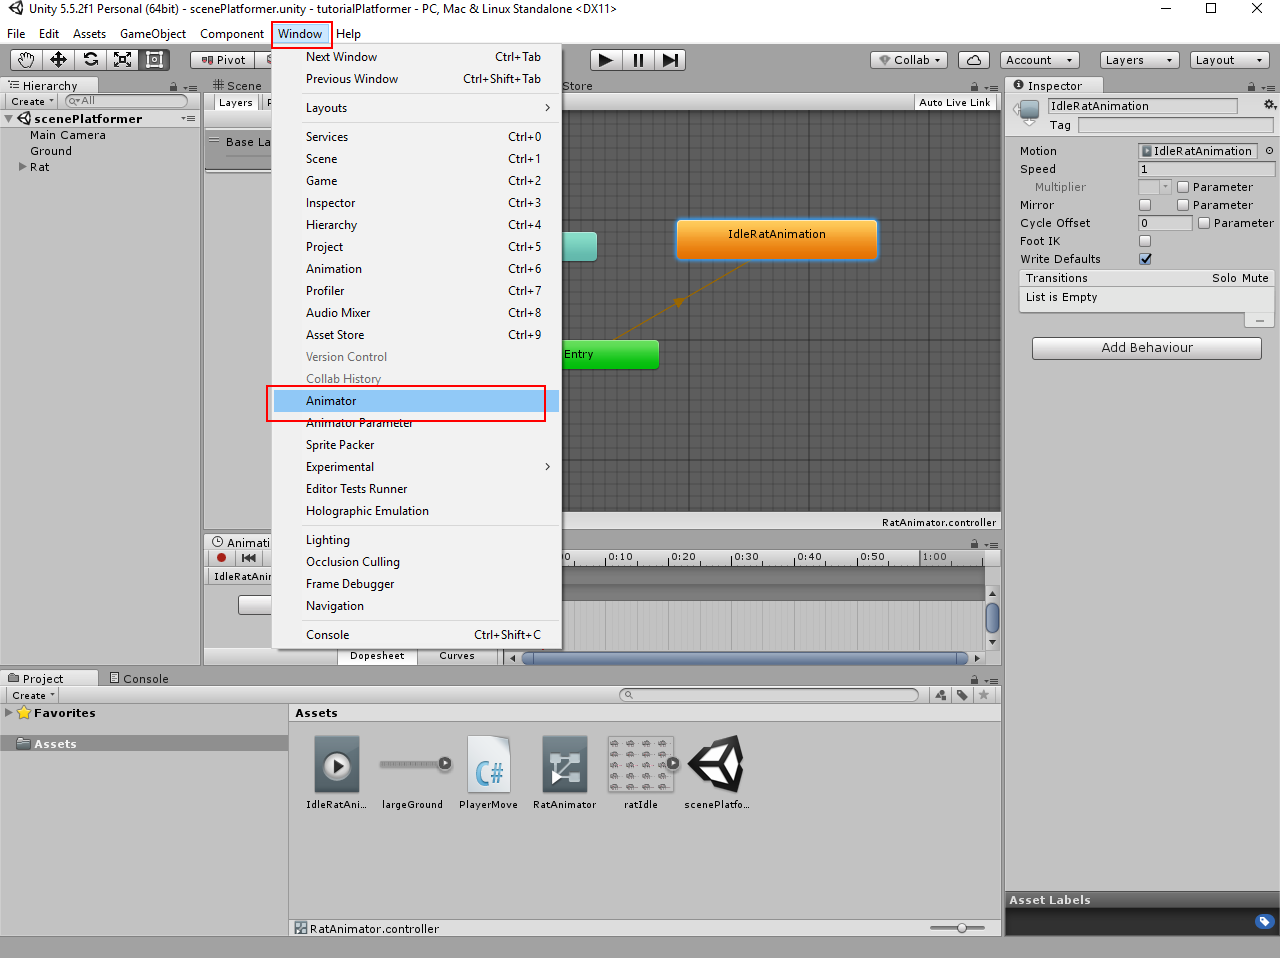
The animation should be in loop. Check it for sure. Go to Animator window and double click on animations box.
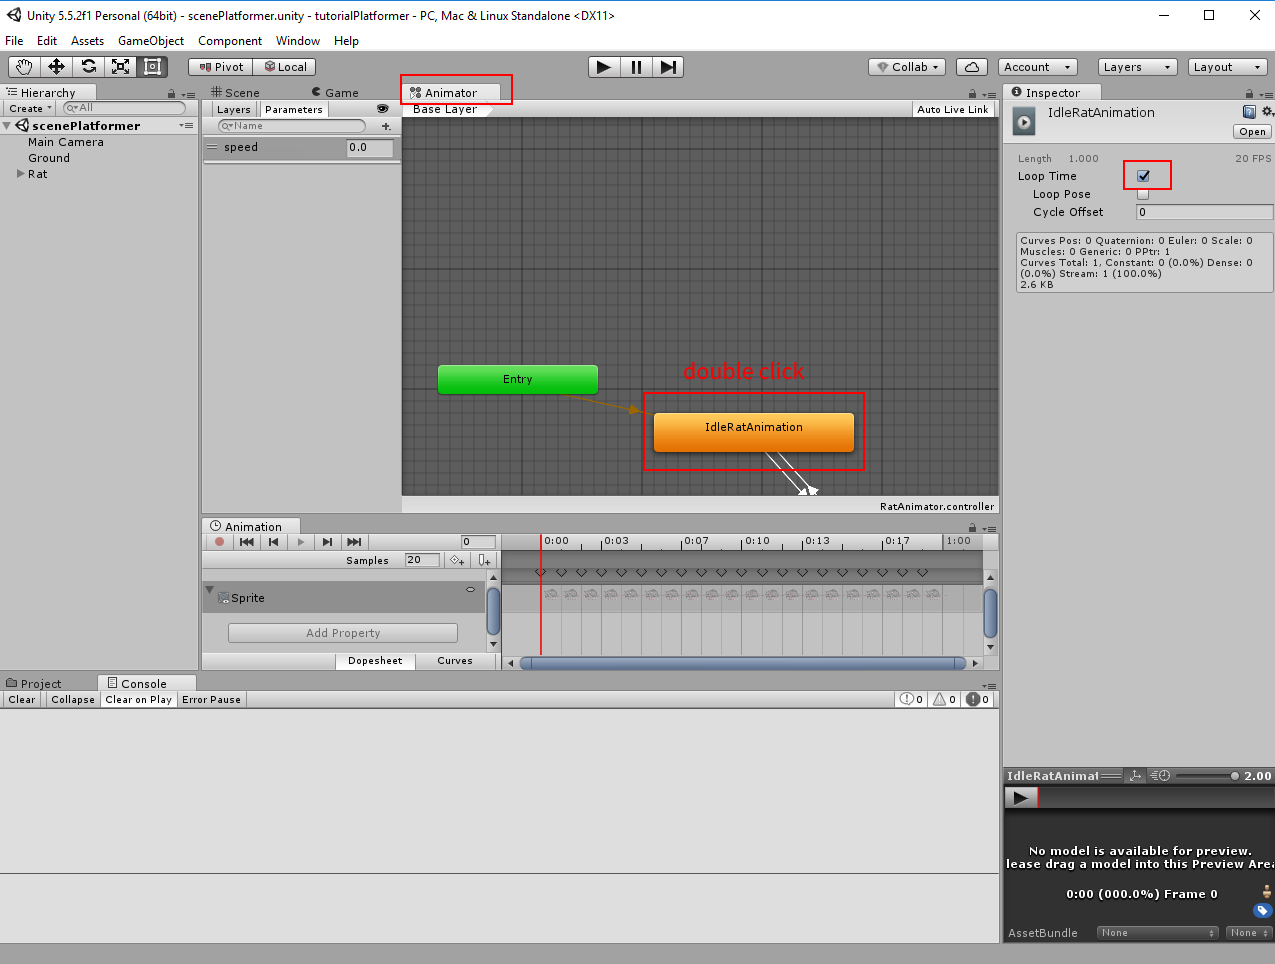
The rat has now an idle animation. Start the game and check it.
8. Step
We can create an animation for running now. Import downloaded ratRun sprite in the Assets. Set its Sprite Mode to Multiple. Go to Sprite Editor and slice the sprite with Grid By Cell Count and Column 4, Row 5 settings (check the 3.Step). Select Rat in the hierarchy. Go to Animations window and click on IdleRatAnimation then click on Create New Clip. Name the new animations as RunRatAnimations.
Expand ratRun sprite and select all 20 frames (select first, hold shift-key and select last frame). Drag&drop all selected frames into Animations window. Set samples to 20. You should double click on the first frame after the speed was changed or animations lenght will stay incorrect (maybe bug in my Unity editor).
Open Animator window now (enable it in Window menu, if you can not see it).
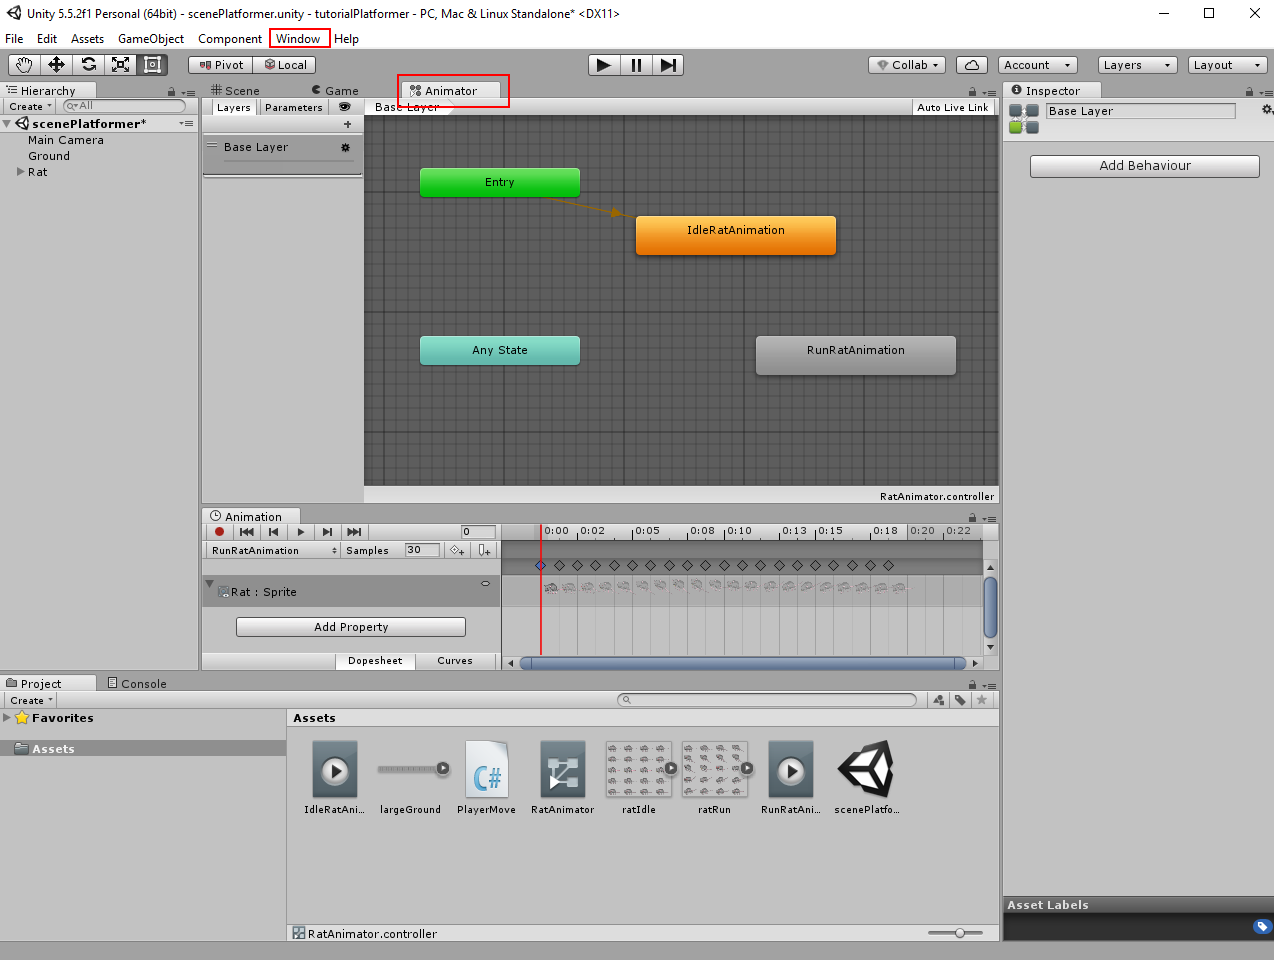
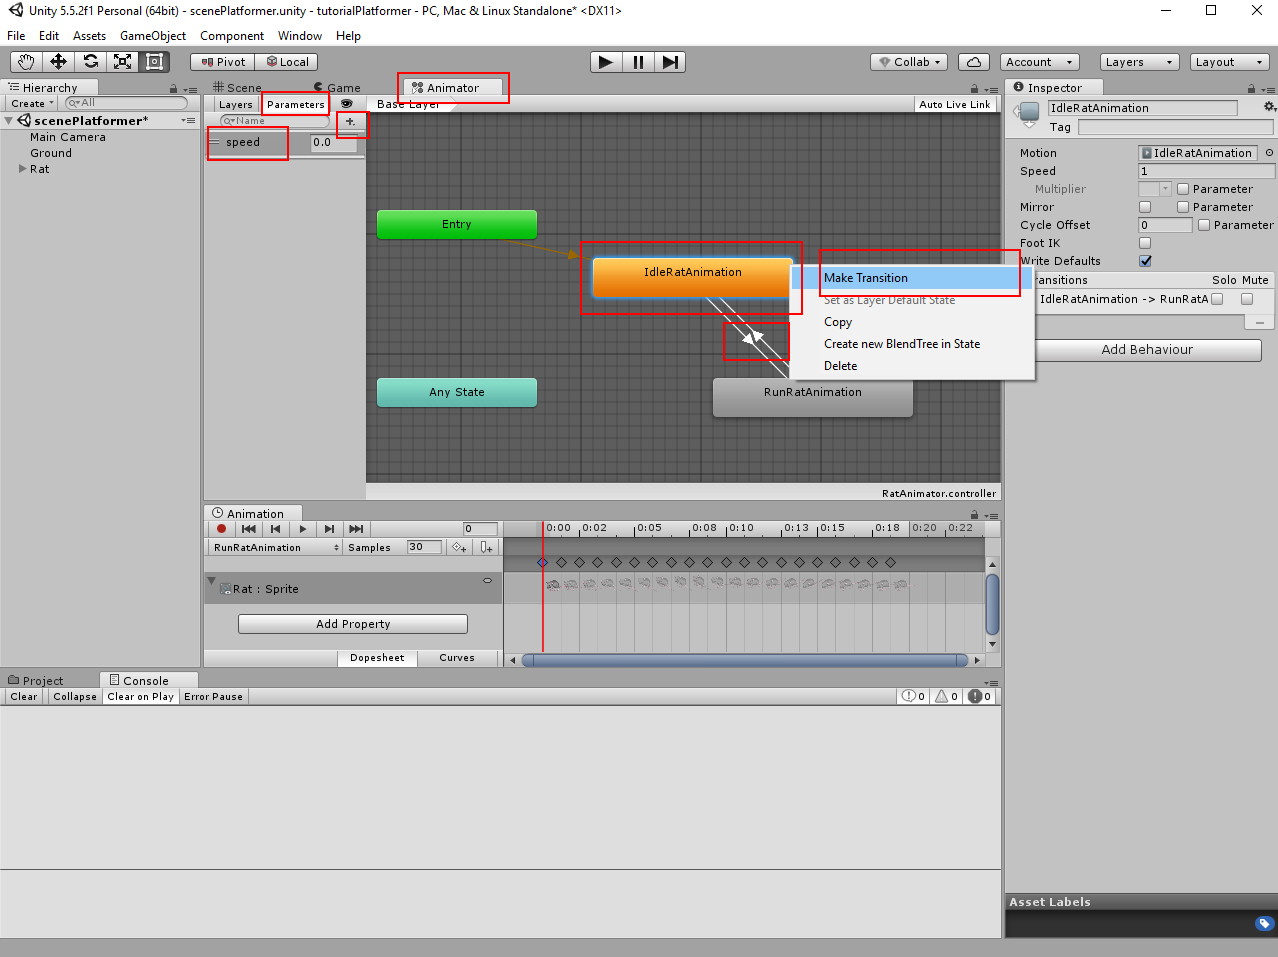
IdleRatAnimation is the default animation. We need transition to other animations and parameters to control the transition. Click on Parameters tab. Add new float speed. Right click on IdleRatAnimation and make transition from IdleRatAnimation to RunRatAnimation. Then right click on RunRatAnimation and make transition to IdleRatAnimation.
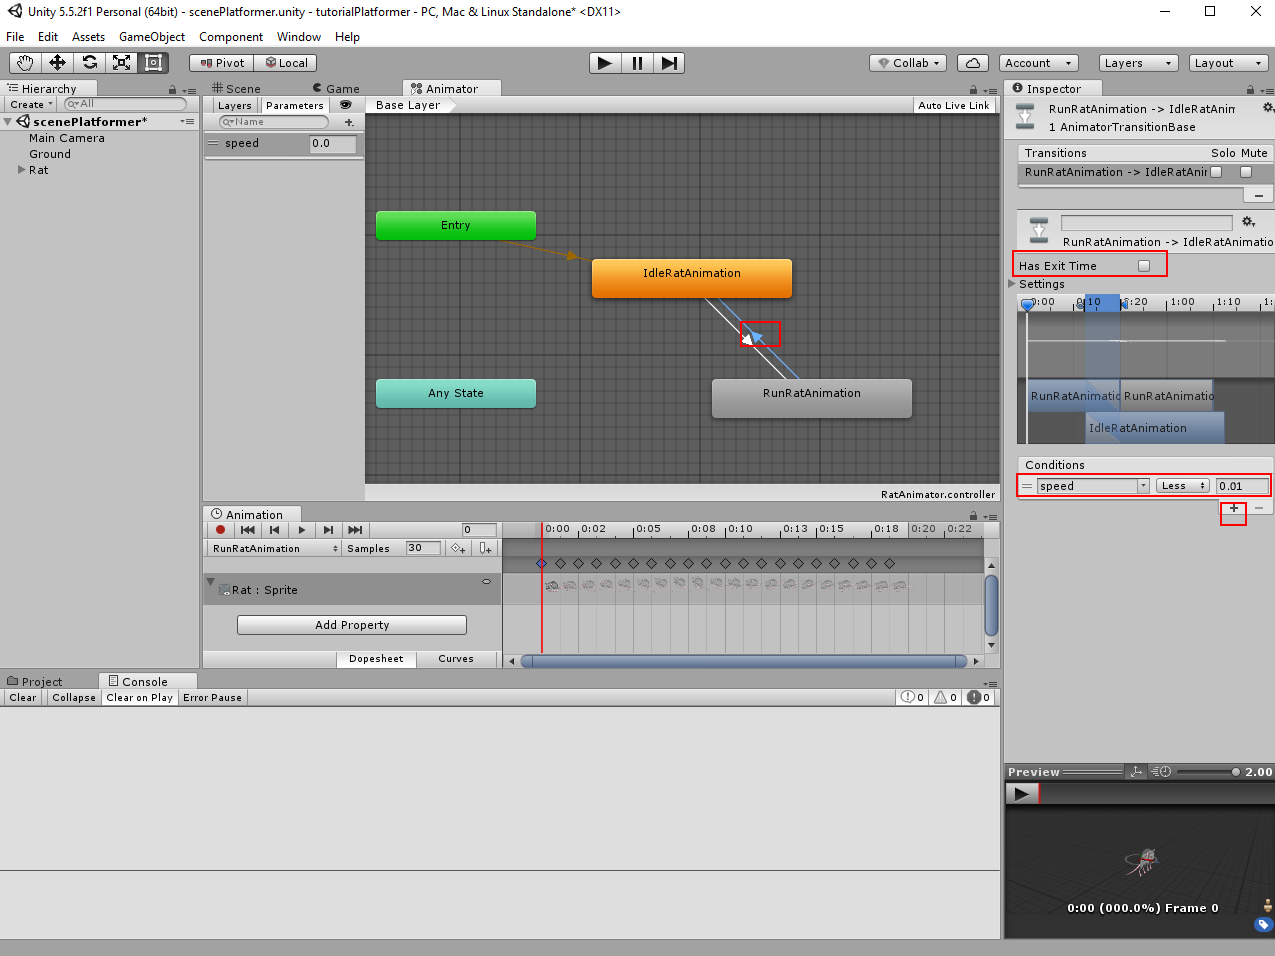
Select the transition from IdleRatAnimation to RunRatAnimation. Disable Has Exit Time. Add new condition. Change it to speed greater 0.01.
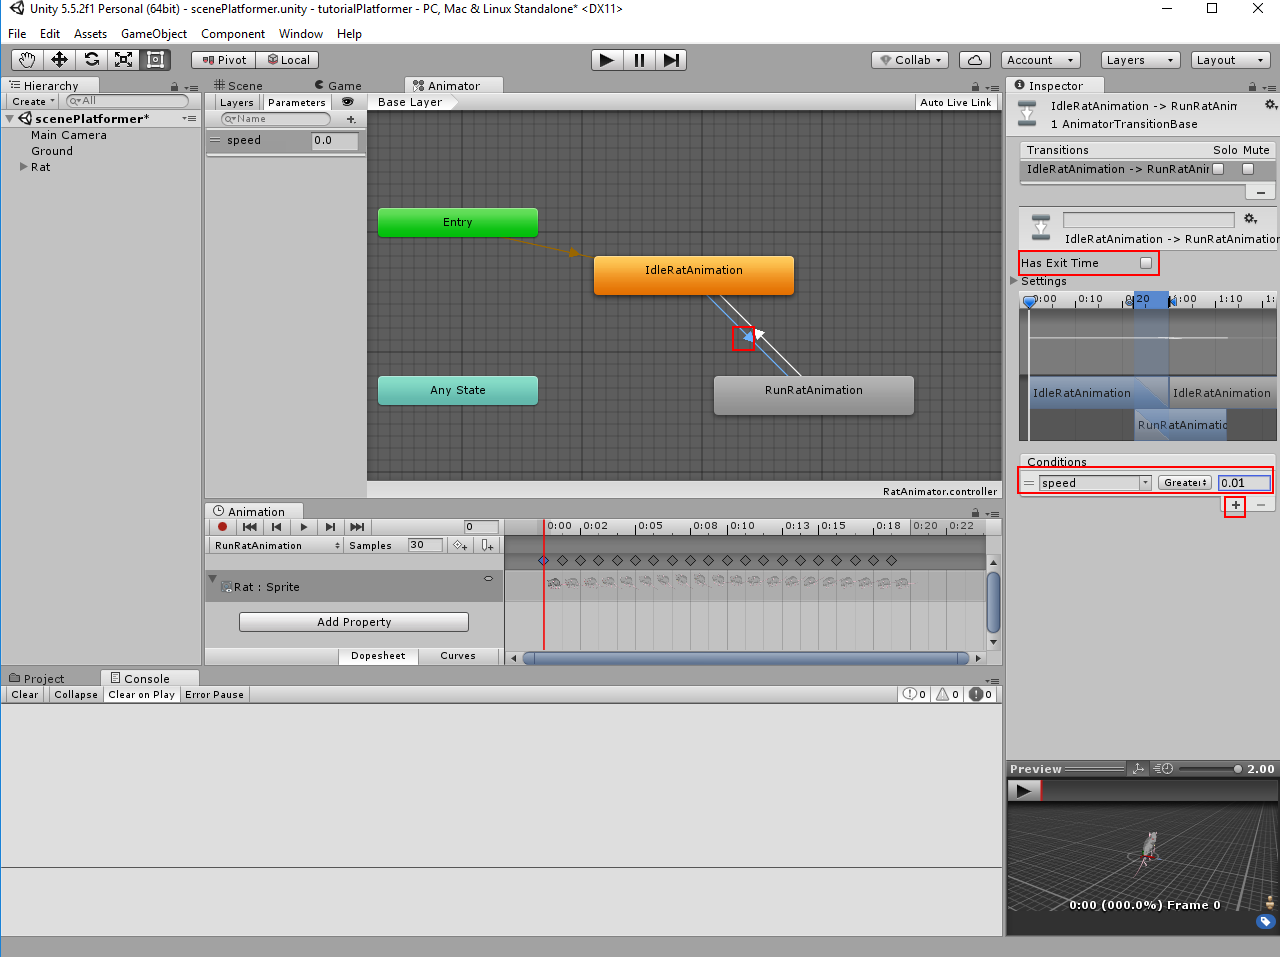
Select the transition from RunRatAnimation to IdleRatAnimation. Disable Has Exit Time. Add new condition. Change it to speed less 0.01.
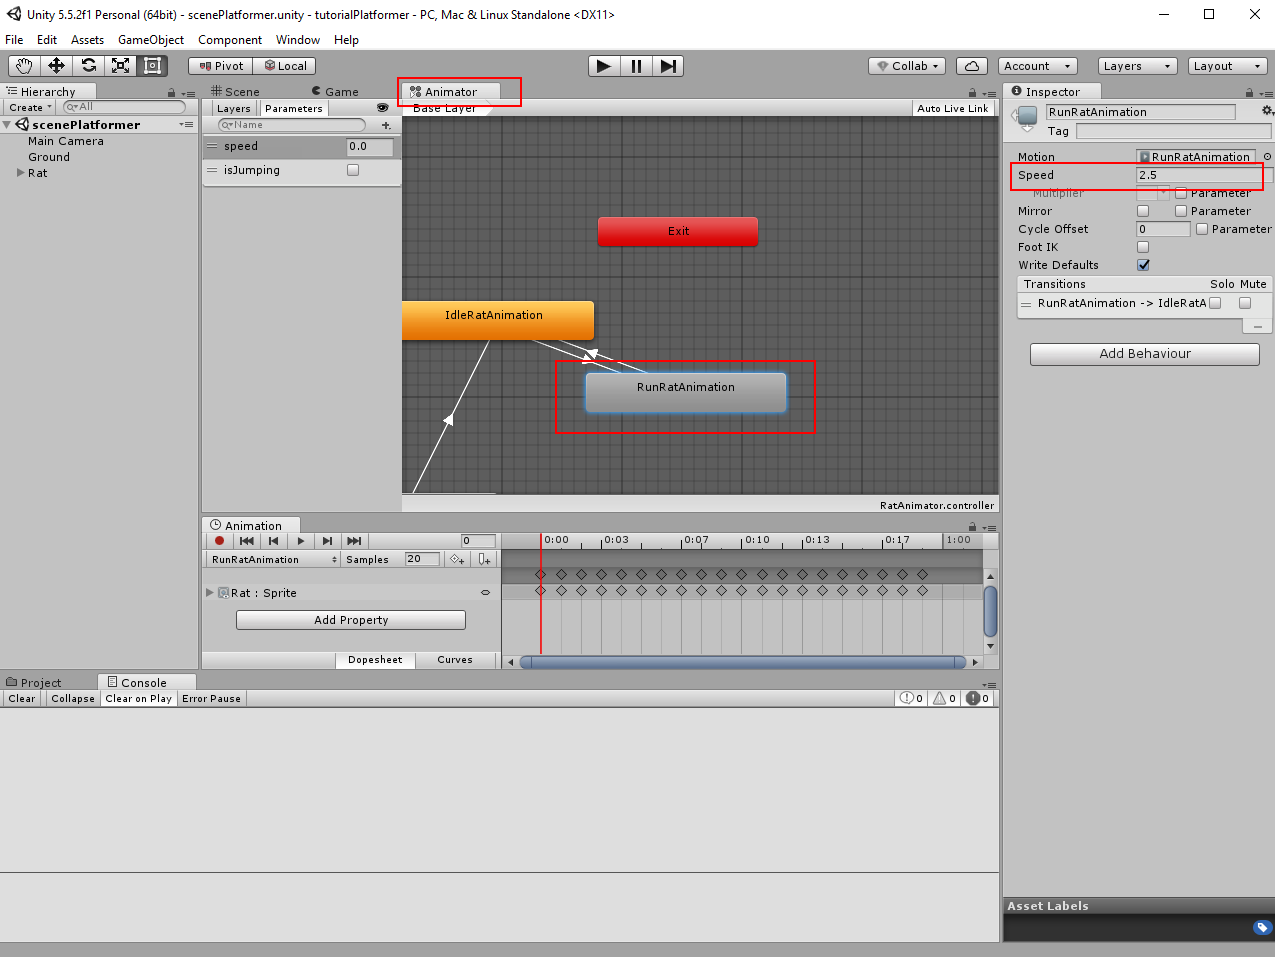
The run animation is to slow. Select RunRatAnimation box in theAnimator and change speed to 2.5 (you can adjust it later as you like).
9. Step
We need a script to change conditions from the Animator. We could just change the PlayerMove script, but I think we will make another script and get access to the other components from the script. We will check if the rat is moving, and then we will switch the animation from idle to run. And vice versa, if the rat stays, then we switch from running to idle. Create new C# script and name it PlayerAnim.
using System.Collections;
using System.Collections.Generic;
using UnityEngine;
public class PlayerAnim : MonoBehaviour {
//reference variable for Animator component
Animator anim;
//reference variable for Rigidbody2D component
Rigidbody2D rb;
void Start () {
//reference to Animator
anim = GetComponent <Animator> ();
//reference to Rigidbody2D
rb = GetComponent <Rigidbody2D> ();
}
void Update () {
//сhange the speed parameter in Animator. Use the absolute value of x from the velocity vector
anim.SetFloat ("speed", Mathf.Abs (rb.velocity.x));
}
}
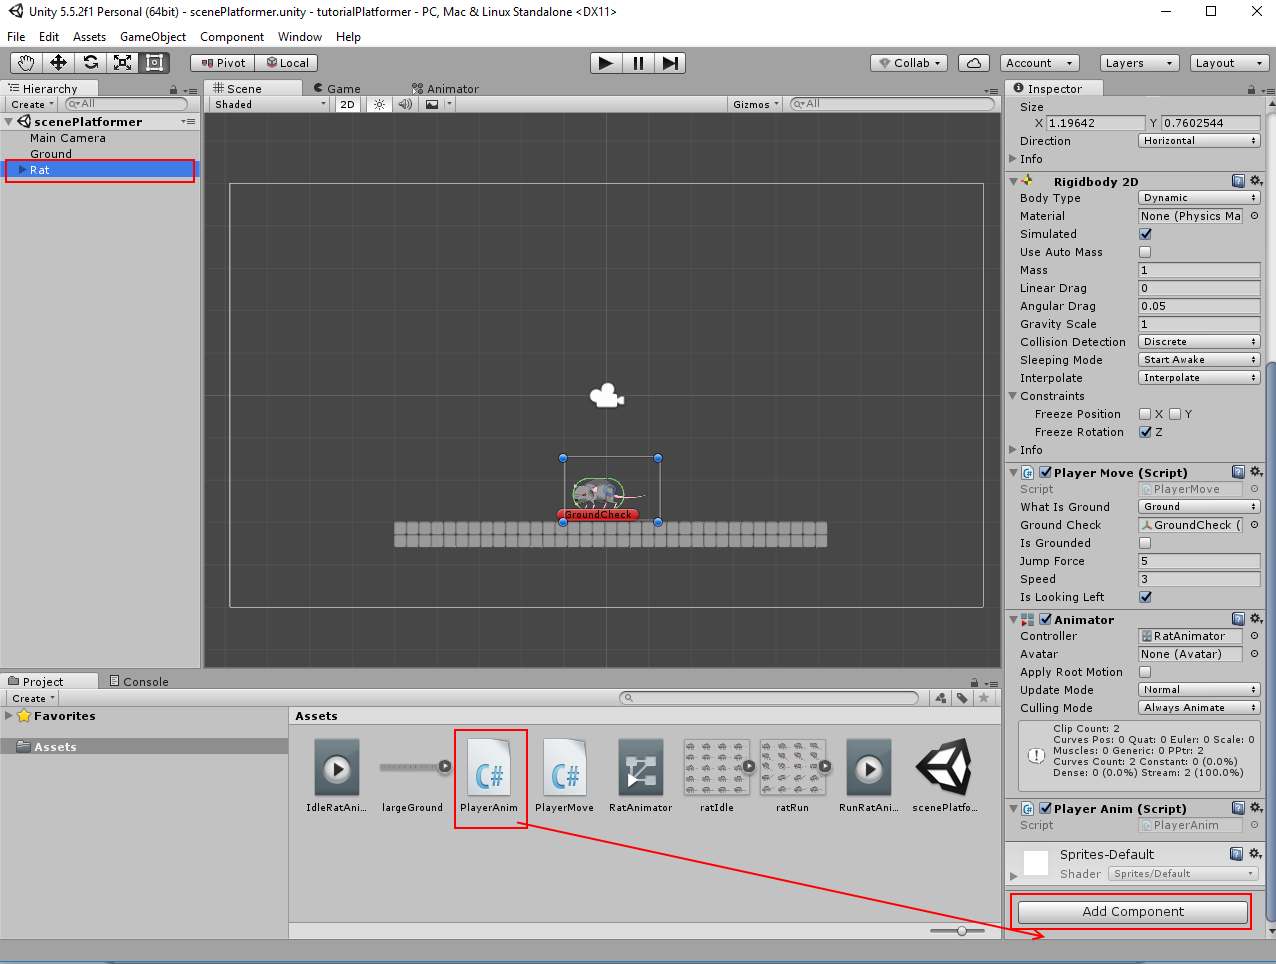
Add this script to the Rat.using System.Collections.Generic;
using UnityEngine;
public class PlayerAnim : MonoBehaviour {
//reference variable for Animator component
Animator anim;
//reference variable for Rigidbody2D component
Rigidbody2D rb;
void Start () {
//reference to Animator
anim = GetComponent <Animator> ();
//reference to Rigidbody2D
rb = GetComponent <Rigidbody2D> ();
}
void Update () {
//сhange the speed parameter in Animator. Use the absolute value of x from the velocity vector
anim.SetFloat ("speed", Mathf.Abs (rb.velocity.x));
}
}
Start the scene. The rat has runing animation now.
10. Step
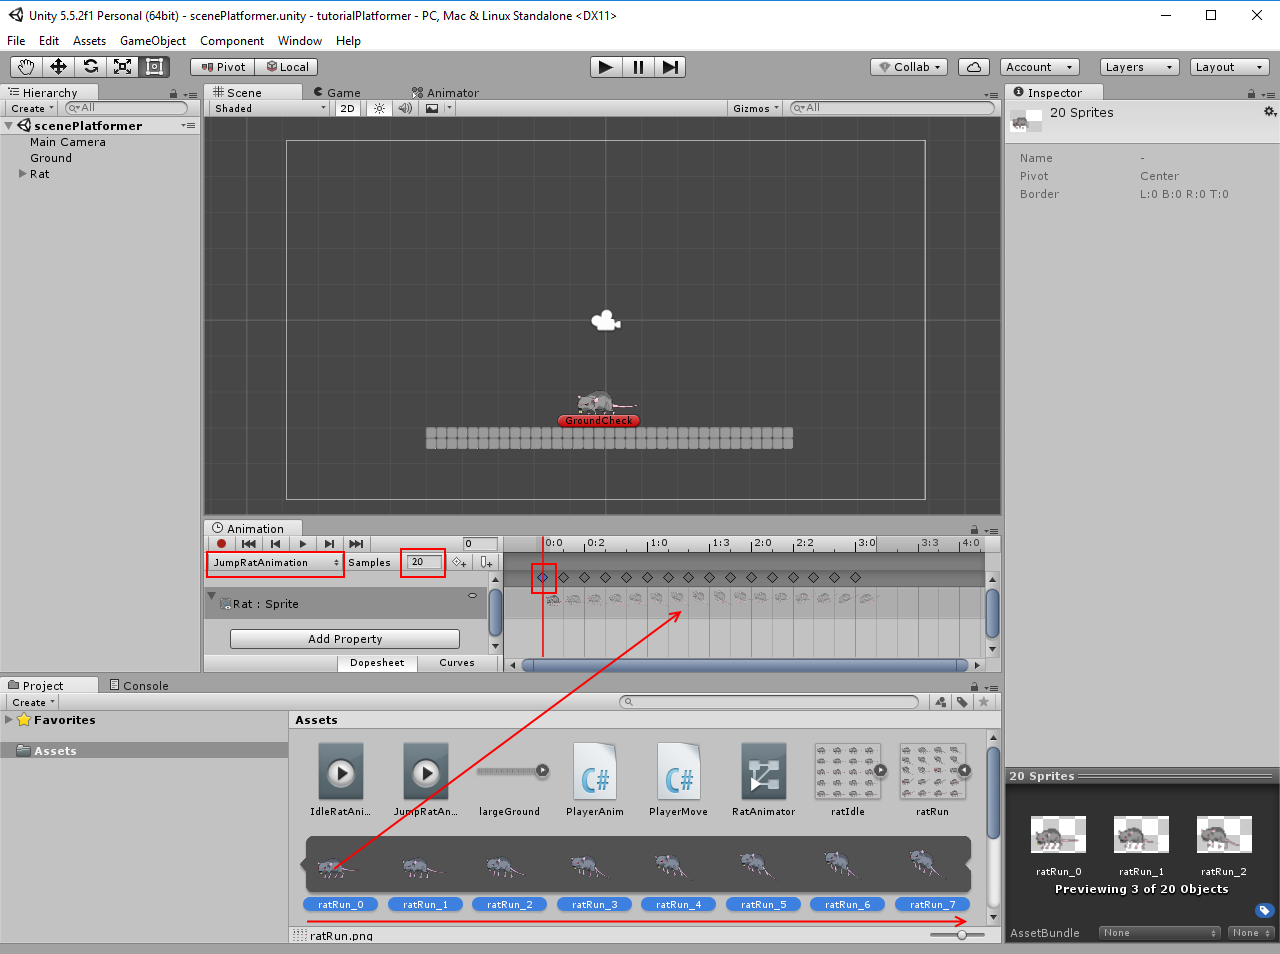
Now we can make jump animation for the rat. Select Rat in the hierarchy. Add new animation (in Animation window) and name it JumpRatAnimation.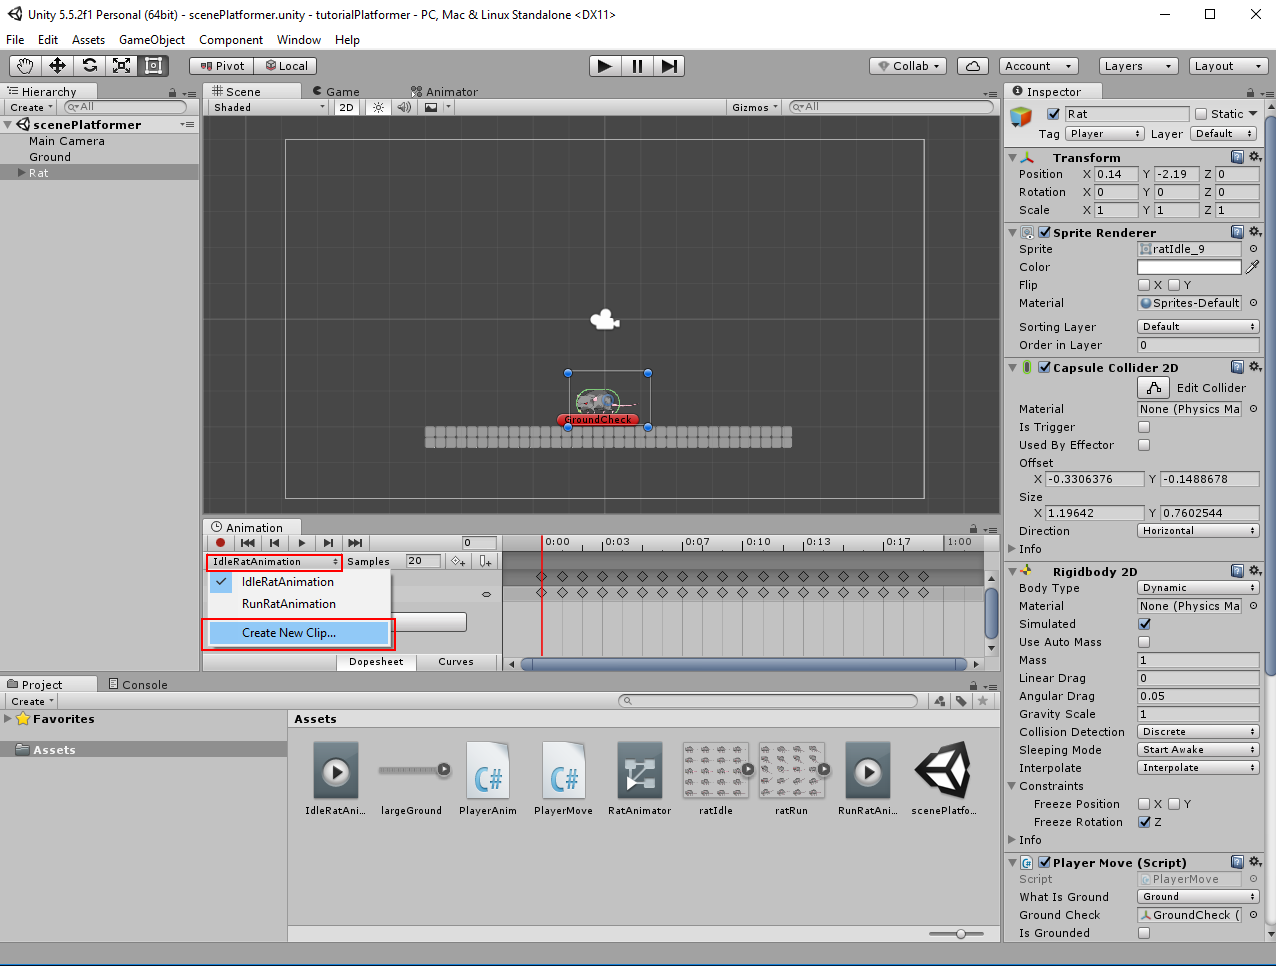
I don't have jump animation, but we can use slow run animation for that. Select Rat in the hierarchy. Check Animation window, JumpRatAnimation should be selected. Expand the ratRun sprite. Select now all frames in it (select first frame hold Shift-Key down and select the last frame). Drag&drop selected frames into Animation window. Set samples to 20. You should double click on the first frame after the speed was changed or animations lenght will stay incorrect (maybe bug in my Unity editor).
11. Step
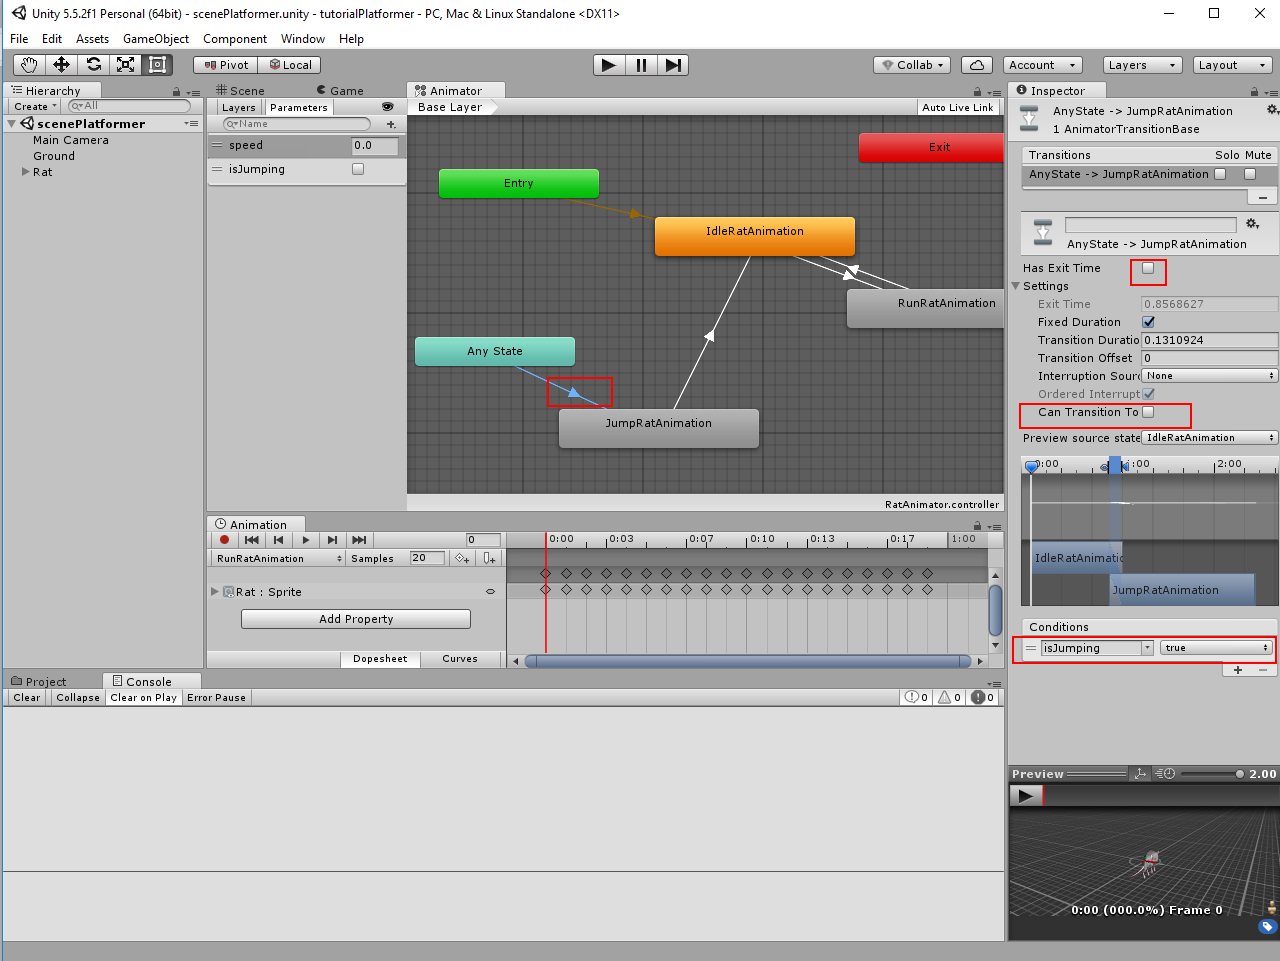
Switch to Animator window. We need a condition for jump animation. Add new Bool and name it isJumping. Make now the transition (use right click) from Any State to JumpRatAnimation. Add the transition from JumpRatAnimation to IdleRatAnimation.
Select the transition from Any State to JumpRatAnimation. Disable Has Exit Time. Expand Settings and disable Can Transition To (to prevent the animations restart, while isJumping is true). Add condition isJumping true.
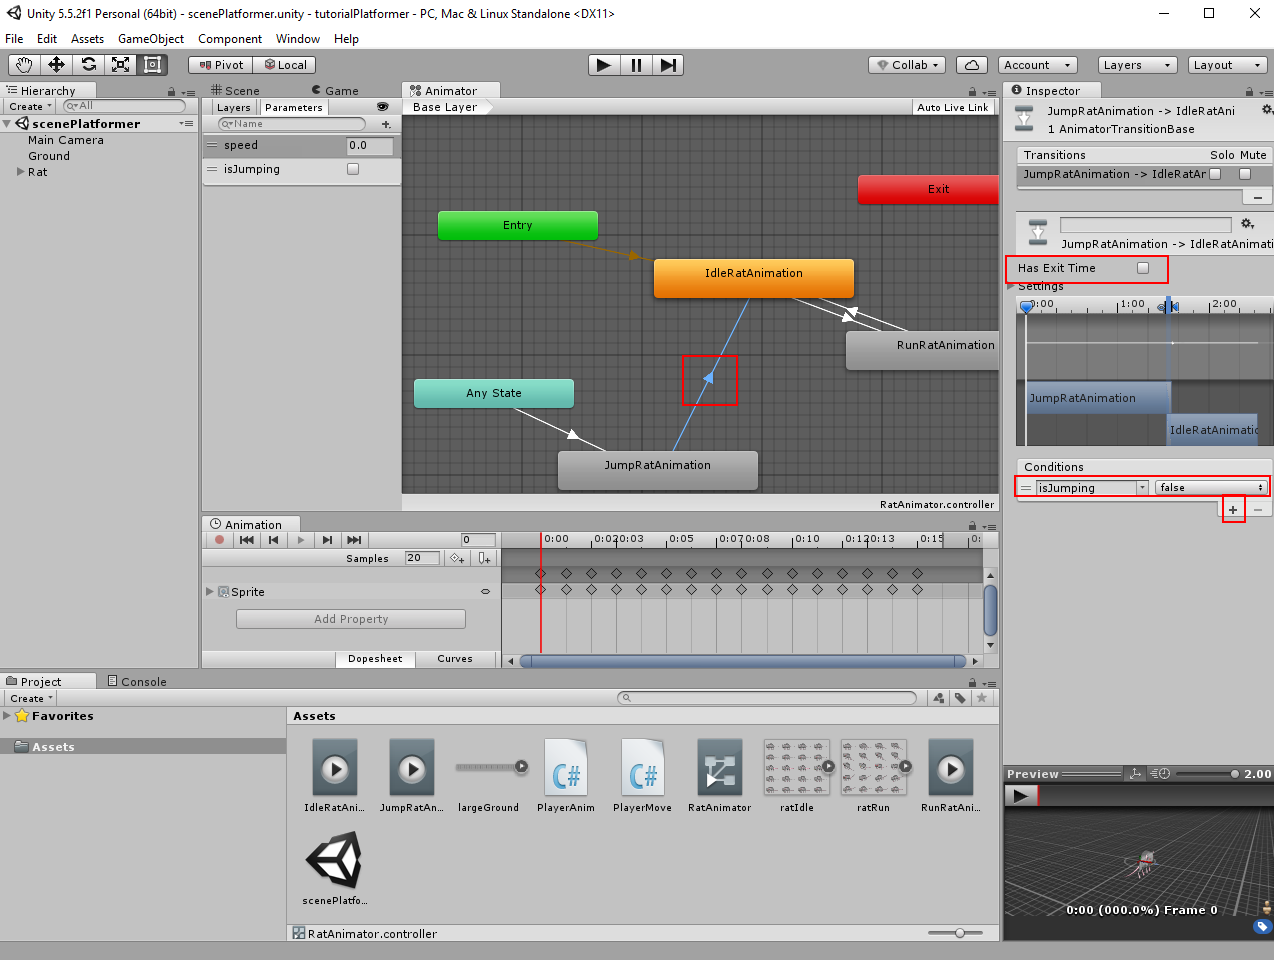
Select the transition from JumpRatAnimation to IdleRatAnimation. Disable Has Exit Time. Add condition isJumping false.
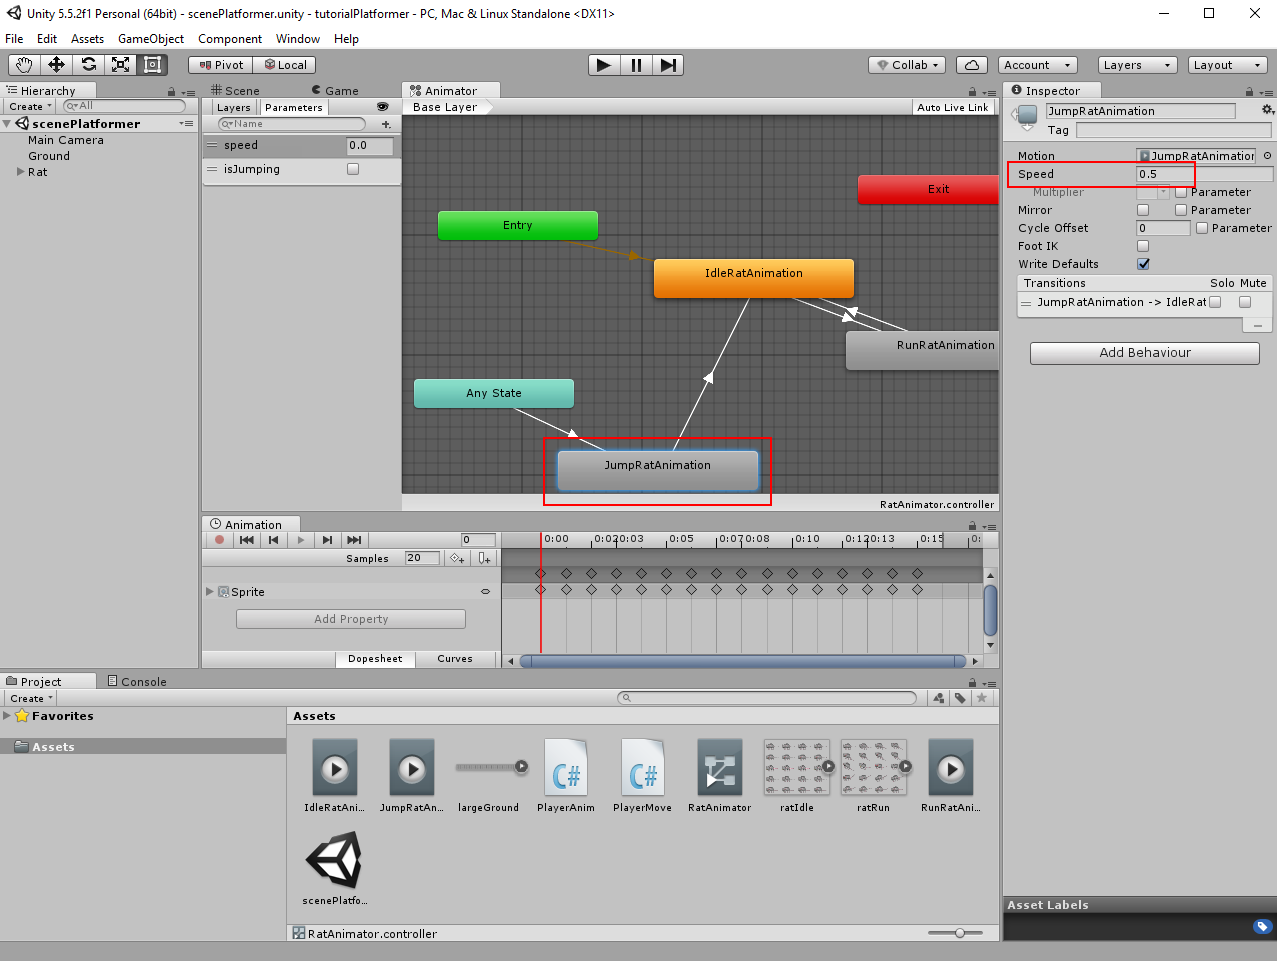
Select JumpRatAnimation and change Speed to 0.5. Slow run animation should look like as jump animation.
12. Step
We need a script to control the jump animation. Open PlayerAnim script. From this script we will access to PlayerMove script and then check the isGrounded variable. If the rat isn't on the ground, then we will switch animation to jump animation. Also the jump animation will play too if the rat is falling.
using System.Collections;
using System.Collections.Generic;
using UnityEngine;
public class PlayerAnim : MonoBehaviour {
//reference variable for Animator component
Animator anim;
//reference variable for Rigidbody2D component
Rigidbody2D rb;
//reference variable for PlayerMove script
PlayerMove pm;
void Start () {
//reference to Animator
anim = GetComponent <Animator> ();
//reference to Rigidbody2D
rb = GetComponent <Rigidbody2D> ();
//reference to PlayerMove
pm = GetComponent <PlayerMove> ();
}
void Update () {
//check, if the rat is on the ground, we take the state from the PlayerMove script
if (pm.isGrounded) {
//set animators parameter isJumping to false
anim.SetBool ("isJumping", false);
//сhange the speed parameter in Animator. Use the absolute value of x from the velocity vector
anim.SetFloat ("speed", Mathf.Abs (rb.velocity.x));
// if the rat isn't on the ground
} else {
//сhange the speed parameter in Animator to zero
anim.SetFloat ("speed", 0);
//сhange the isJumping parameter in Animator to true
anim.SetBool ("isJumping", true);
}
}
}
You can check the scene.using System.Collections.Generic;
using UnityEngine;
public class PlayerAnim : MonoBehaviour {
//reference variable for Animator component
Animator anim;
//reference variable for Rigidbody2D component
Rigidbody2D rb;
//reference variable for PlayerMove script
PlayerMove pm;
void Start () {
//reference to Animator
anim = GetComponent <Animator> ();
//reference to Rigidbody2D
rb = GetComponent <Rigidbody2D> ();
//reference to PlayerMove
pm = GetComponent <PlayerMove> ();
}
void Update () {
//check, if the rat is on the ground, we take the state from the PlayerMove script
if (pm.isGrounded) {
//set animators parameter isJumping to false
anim.SetBool ("isJumping", false);
//сhange the speed parameter in Animator. Use the absolute value of x from the velocity vector
anim.SetFloat ("speed", Mathf.Abs (rb.velocity.x));
// if the rat isn't on the ground
} else {
//сhange the speed parameter in Animator to zero
anim.SetFloat ("speed", 0);
//сhange the isJumping parameter in Animator to true
anim.SetBool ("isJumping", true);
}
}
}
13. Step
Now we can add footsteps to the rat. We will create a function that will play sounds. This function will be called through the animator. Create new C# script and name it PlayerSound.
using System.Collections;
using System.Collections.Generic;
using UnityEngine;
public class PlayerSound : MonoBehaviour {
//reference variable for audio clip
public AudioClip footsteps;
//public function, we can access to it from animator
public void FootStepsAudio () {
//play a sound clip at specified position (position from the rat)
AudioSource.PlayClipAtPoint (footsteps, transform.position);
}
}
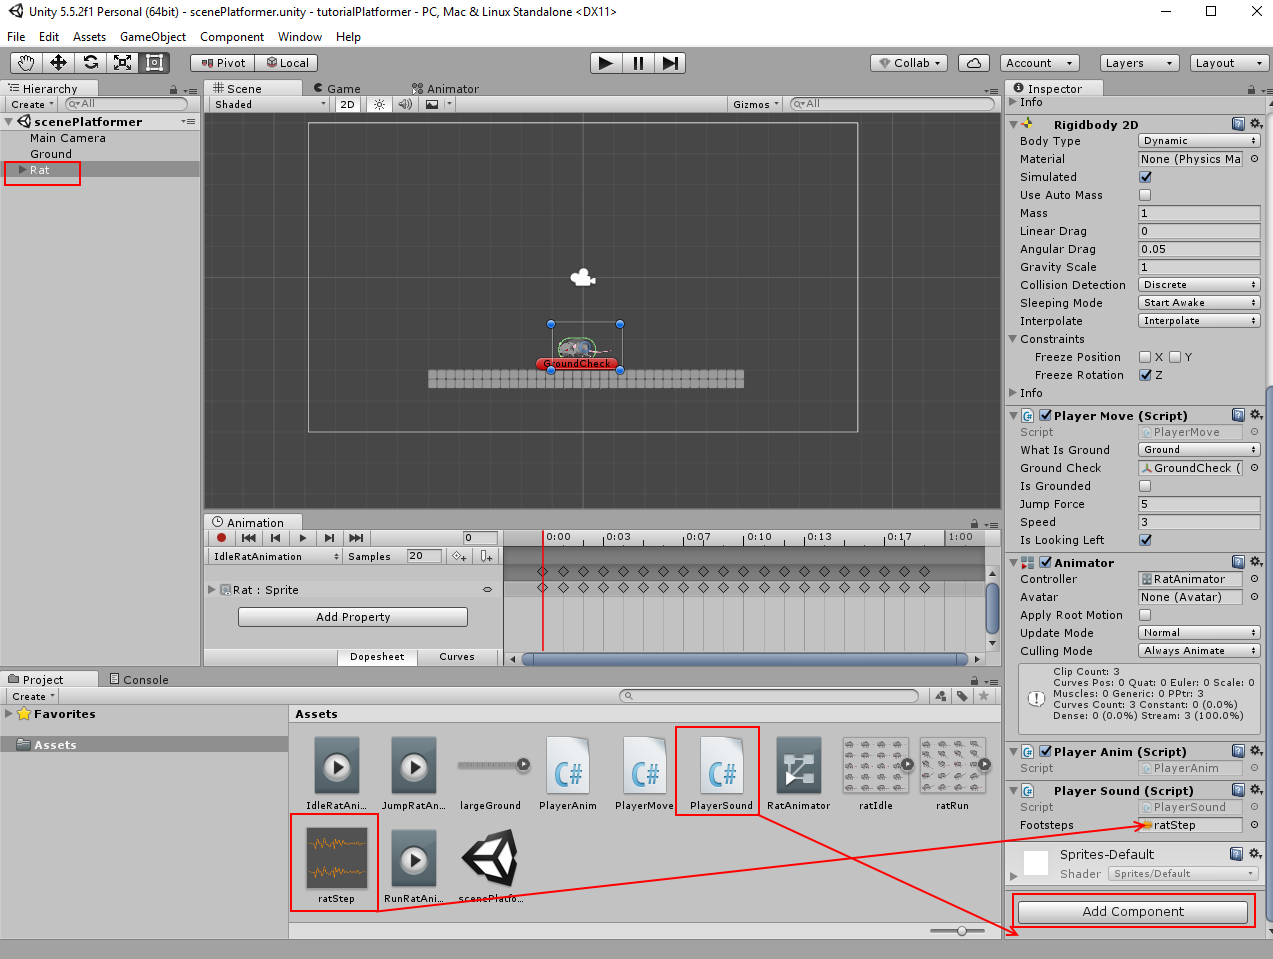
Select Rat in hierarchy and add this script to the rat. Import ratStep from the downloaded archive. And put ratStep in the Footsteps field from the PlayerSound component.using System.Collections.Generic;
using UnityEngine;
public class PlayerSound : MonoBehaviour {
//reference variable for audio clip
public AudioClip footsteps;
//public function, we can access to it from animator
public void FootStepsAudio () {
//play a sound clip at specified position (position from the rat)
AudioSource.PlayClipAtPoint (footsteps, transform.position);
}
}
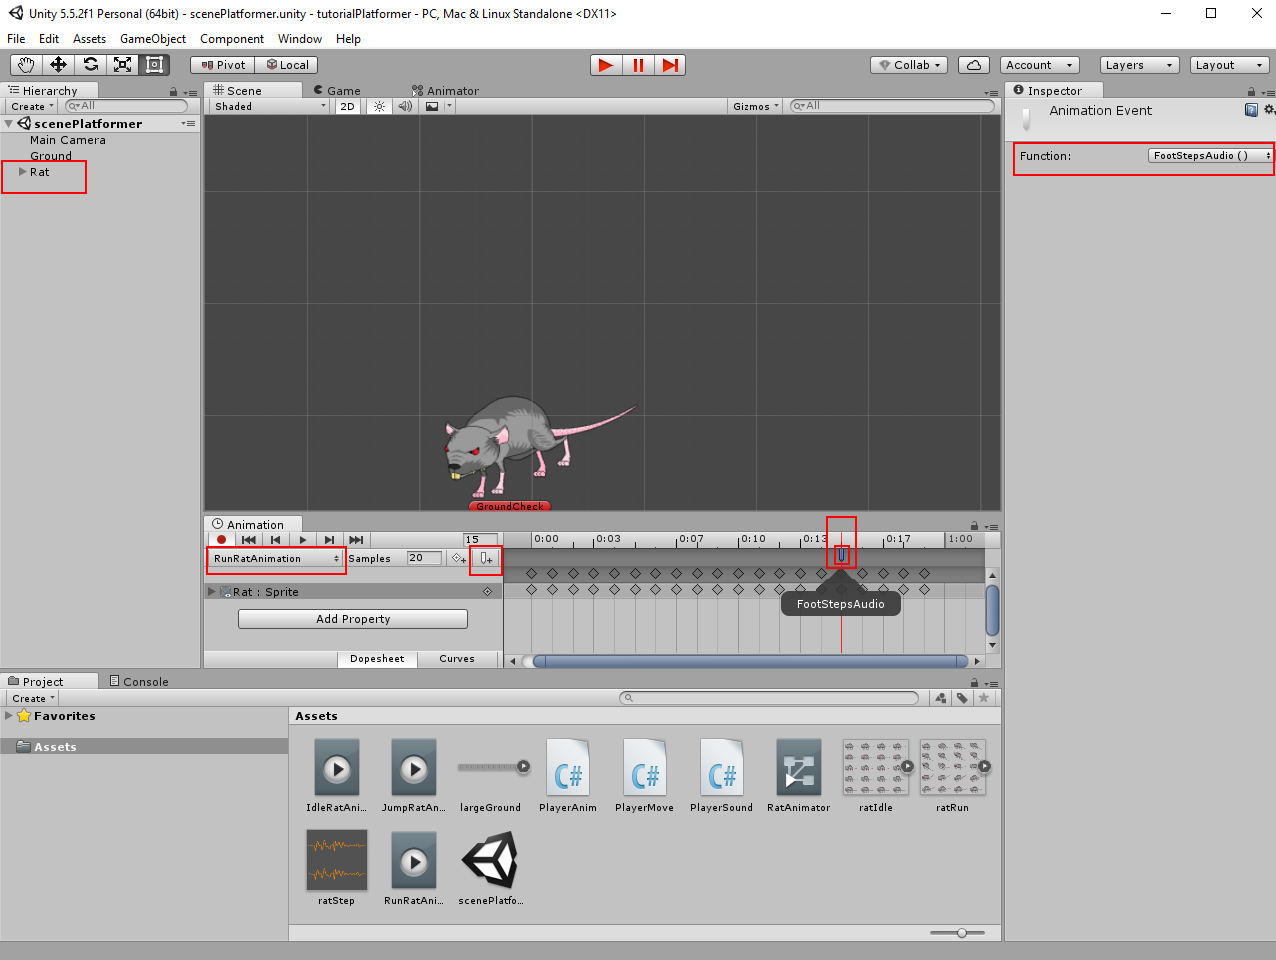
Select Rat in hierarch and go to Animation window. Switch to RunRatAnimation. Select the frame where you want to play the sound (click on timeline). And click on Add Event (check the screenshot). Select the added Animations Event and set the Function to FootStepsAudio().
14. Step
We can add sound after the jump if the rat touches the ground. We can use OnCollisionEnter2D for that. Check the Unity Manual for info. Open PlayerSound script.
using System.Collections;
using System.Collections.Generic;
using UnityEngine;
public class PlayerSound : MonoBehaviour {
//reference variable for audio clip
public AudioClip footsteps;
//public function, we can access to it from animator
public void FootStepsAudio () {
//play a sound clip at specified position (position from the rat)
AudioSource.PlayClipAtPoint (footsteps, transform.position);
}
//will be started if an other Collider2D was touched
void OnCollisionEnter2D (Collision2D coll) {
//check, if touched collider2D has tag "Ground"
if (coll.gameObject.tag == "Ground") {
//play a sound clip at specified position (position from the rat)
AudioSource.PlayClipAtPoint (footsteps, transform.position);
}
}
}
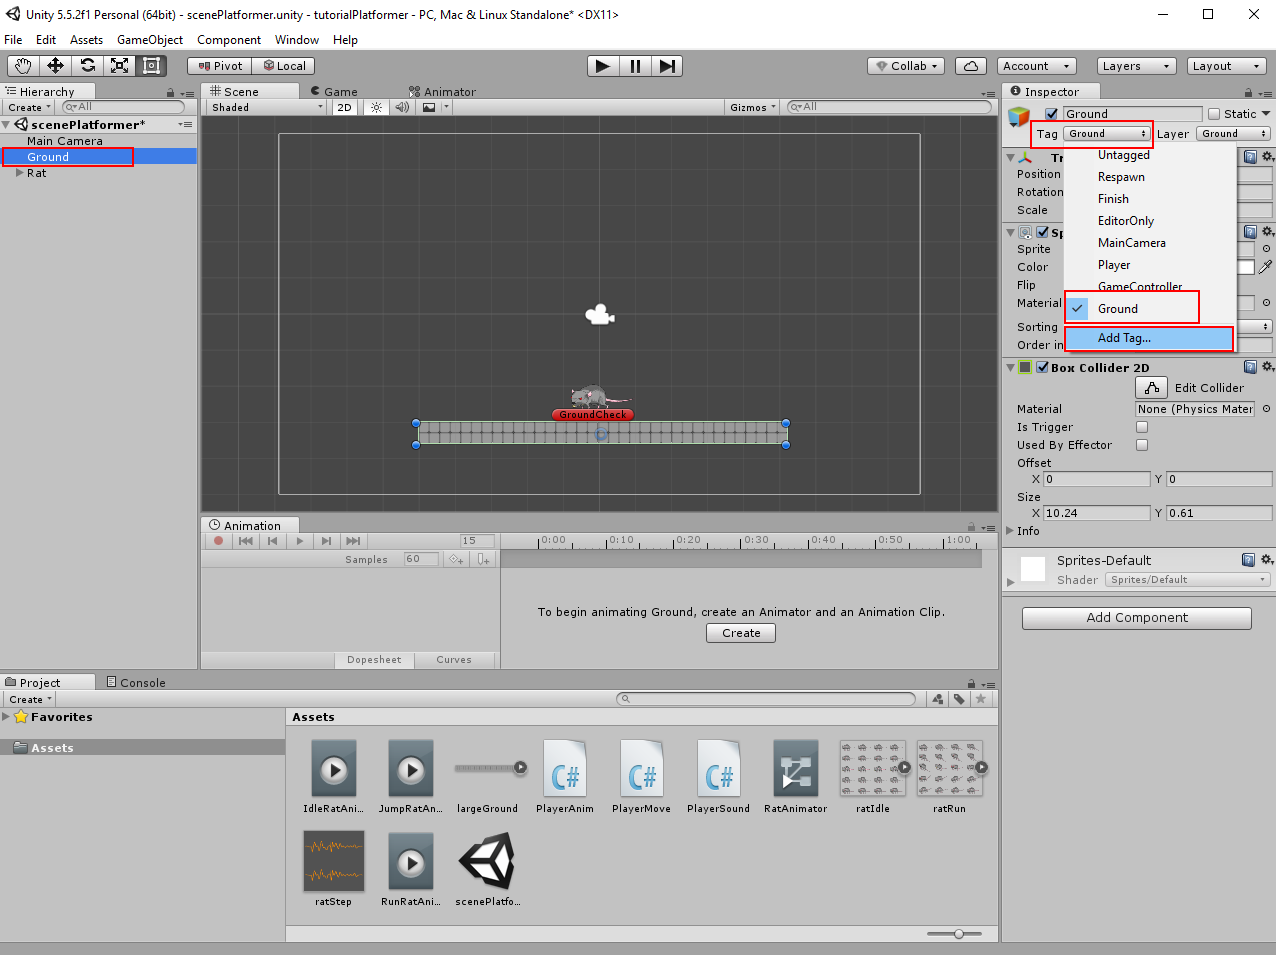
Select Ground in the hierarchy. Add new tag Ground and set the tag from gameobject Ground to Ground.using System.Collections.Generic;
using UnityEngine;
public class PlayerSound : MonoBehaviour {
//reference variable for audio clip
public AudioClip footsteps;
//public function, we can access to it from animator
public void FootStepsAudio () {
//play a sound clip at specified position (position from the rat)
AudioSource.PlayClipAtPoint (footsteps, transform.position);
}
//will be started if an other Collider2D was touched
void OnCollisionEnter2D (Collision2D coll) {
//check, if touched collider2D has tag "Ground"
if (coll.gameObject.tag == "Ground") {
//play a sound clip at specified position (position from the rat)
AudioSource.PlayClipAtPoint (footsteps, transform.position);
}
}
}
15. Step
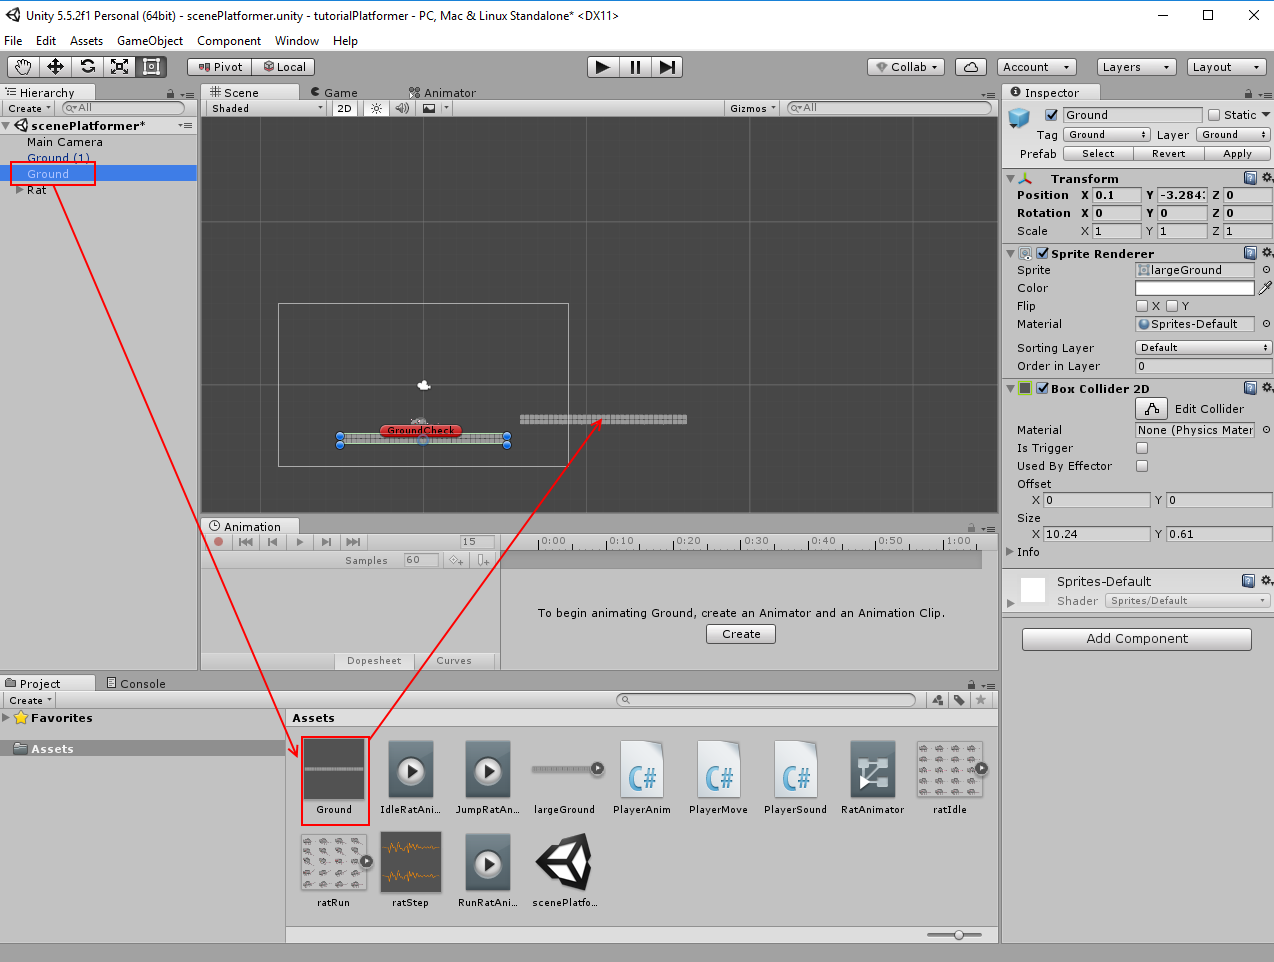
Select Ground in the hierarchy. Create prefab Ground (drag&drop this gameobject into the Assets).Place now Ground prefab in the scene as next platform.
Select Main Camera in the hierarchy and make it child from Rat (drag&drop Main Camera on Rat). The camera will follow the rat now.
You can change X-position from the camera to 0, to avoid jerks by turning.
I think, this is enough for the first part. I hope that the second part will be ready in May-June (sorry, I don't have much time right now).
 this tutorial as unity package